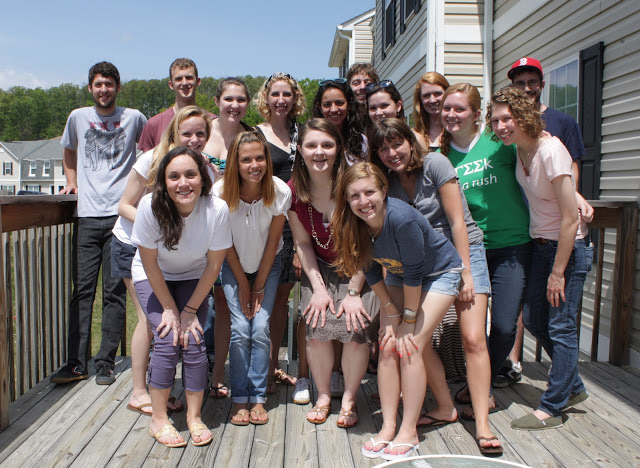
Then, All of the Sudden...

...I became a James Madison University Alum.

After four of the most challenging, rewarding, terrifying, enlightening, self-discovering, mind-numbing, but sometimes, just plain fun years of my life, I graduated on Saturday with a degree in Media Arts and Design and a minor in Studio Art/Graphic Design. I’m still not sure how I feel about it quite yet. For so long I thought I would experience nothing but joy for completing this journey but now a part of me wishes it hadn’t ended. I now face a vast world on unknown instead of the friendly familiar. Time will tell what happens next, I suppose. For now, I’ll take a little while to relax, mull things over, unpack, and relish in my new title as a college graduate.

In the weeks leading up to moving out of my apartment I had a goal to use up as much of the remaining bits of food shoved into the corners of the pantry, fridge, and freezer. I did a pretty good job. By the time I moved out all I had left in the refrigerator was half a tube of anchovy paste, vegetable bouillon paste, a jar of tahini, mayonnaise, and an old lump of Parmesan cheese. There is something slightly satisfying about whipping up a dish out of the meager remains of the fridge and leaving clean and nearly empty shelves behind. That’s what I did about two weeks ago and ended up with a fairly original take on two spring classics.

I have a difficult time getting through a whole loaf of bread by myself before it goes stale so I usually take about a third of it and freeze it for later use. I noticed I had about four different bread nubbins sitting in my freezer and finally decided to use them to make a good savory and cheesy bread pudding. I searched around the kitchen for more flavor inspiration. Half a bag of frozen corn and frozen lima beans. A wedge of Swiss cheese. Some sundried tomatoes. And finally, a large bunch of Swiss chard I got from the farmers market because I couldn’t resist its pink, yellow, orange, and green stems. It all started to sound like a succotash to me. So it hit me: savory succotash bread pudding. I also like to call it rainbow pudding because of its plethora of colors. I know it sounds like it could be something including a Jell-O packet and food coloring but believe me, my rainbow pudding is waaay better.

It is comforting, but it also not quite so indicative of cold winter nights. With the fresh flavors and bursts of color, this veggie-laden bread pudding is what springtime is all about. The beans, corn, and sundried tomatoes are crunchy and sweet while the chard and basil offset it with a bit of bitterness and earthiness. The bacon and Swiss come together to turn it into something just a little bit more indulgent and add smokiness and a slight bit of nutty tang. I made a nice big batch so that I could easily heat up a portion throughout the week as I worked on final projects and studied for my tests. It may have originated from an assortment of leftovers but a pot of bread pudding gold is what it became at the end.

P.S. I made a really fun cookbook this semester for my final sculpture project. You can view it here. If you are interested in buying a copy there is a purchase link at the bottom of the right sidebar on this blog. Enjoy!

Savory Succotash “Rainbow” Pudding
serves 4

Now just to warn you, I am a newly converted fan of bread pudding. I was always turned off by the soggy bread aspect until one time when I got bread pudding that was a bit more dry than usual and found that to be quite delicious. I especially like the crunchy top layer. So just to warn you, this recipe does make a rather dry pudding. If you like your bread super custardy and soggy, then feel free to add as many extra splashes of milk that you would like. Also, you will see that this recipe mostly uses evaporated milk. It's the key to making a rich and sturdier bread pudding without the extra fat.

Ingredients
5 cups of fresh rustic bread, cut into 1 inch cubes
1 can 1% or 2% evaporated milk
1 bunch swiss chard
1 Tbs. butter
1 cup frozen or fresh corn, thawed if frozen
½ cup frozen lima bean, thawed
1/3 cup chopped sundried tomatoes in oil
4-5 slices bacon, cooked and chopped into ½ inch bits
2 eggs, lightly beaten
½ cup loosely packed chopped basil
4 oz shredded swiss cheese
¼ - ½ cup lowfat milk*
salt and pepper
pinch of red pepper flakes

*note: add lesser amount if you like dry bread pudding and more if you like a wetter bread pudding.

You don’t even need to add it if you don’t want to

First prepare all of your ingredients. Butter a 9X9 in. glass baking dish. Heat the oven to 350 degrees. Arrange the bread cubes on a sheet tray and place in the oven for 10 minutes until the bread is lightly toasted. Remove from the oven and let cool. Pour the evaporated milk into a small saucepan and bring to a boil. Once boiling, remove from heat and set aside.

Wash and chop the Swiss chard and cook in a steamer basket positioned over a pot with about 1 inch of boiling water. Cover the pot and steam until the chard is tender. Once cooked, place the chard in a clean kitchen towel or cheesecloth and squeeze out some of the excess moisture. Set aside to cool some. In a frying pan, heat the butter over medium heat. Add the corn and lima beans and season with salt and pepper. Sauté for about 5 minutes until it just starts to get some color. Transfer to a bowl to cool slightly.

Pour the bread cubes into a large bowl. Pour over the evaporated milk and stir to coat. Add in the cooled Swiss chard, the sautéed corn and lima beans, the chopped sundried tomatoes, and the bacon. Stir to combine. Season the eggs with salt and pepper and mix the basil into the eggs. Add to the bowl with the bread and stir again to coat everything with the eggs. Finally, add the Swiss cheese and combine thoroughly. Season once more with salt and pepper and a pinch of red pepper flakes, if desired. Add ¼ to ½ cup more of regular lowfat milk if it looks to dry for your preference (see note). Transfer to the baking dish. It may seem like too much but pack it in and it should all fit. Bake at 350 degrees for 45-50 minutes until firm. Cover the top with foil partway through if it seems to be browning too quickly. Cut into four portions and serve immediately.

Victoria Sandwich

This week marks the beginning of the ends. Every day from now until next Saturday I will be exclaiming to anyone who cares to listen that I am doing something for the last time ever. The other day was my last time to have a serious case of the Mondays in college. Friday will be my last day of classes for good! Next Wednesday I will take the final final and then, Saturday May 5th, I will sit on out Quad one last time and throw my purple cap into the air, marking the beginning of the next stage of life. Cue Pomp and Circumstance…now.  

As I celebrate my lasts I also can’t help but reminisce of the pasts. I often tell people that my college experience lasted only 2 years. I tend to ignore the fact that freshmen and sophomore year ever happened. I was a pretty miserable and homesick wreck and rather lonely. I didn’t find a true sense of belonging and meaning to my college experience until the beginning of my junior year when I studied in London for 4 months. I lived with 27 of the most amazing people as well as the team of outstanding faculty and staff for the program and they are the ones who I relied and depended on as I began to make a transformation into the person who I am today. London is where I found independence, where I found my passions for food, travel, and cultural experiences. As cliché as it sounds I came back a changed, more confident and self-assured person. I felt as if I was ready to graduate then, that nothing back in this small town could further my knowledge after what I had just seen abroad. But I was wrong. The past year and a half have been amazing as well and nothing like those first two awful years. With newfound sense of self and of course my London family and our memories alongside me, the remaining time at college has flown in a blur of all-around contentment.

This past weekend I had my study abroad friends over for a farewell gathering potluck, We ate, drank mimosas out of plastic cups, reminisced and subsequently laughed over the many ridiculous things that happened during our four months together, and celebrated our soon to come graduation. These people are my family. We saw each other at our best and worst of times, in our fragility and homesickness but also our sheer moments of bliss. We had drama but, more often that not, we had laughter and we watched each other mature into a higher state and more aware state of ourselves. We are so closely bound by this and therefore, I will miss this group immensely. 

For our potluck I made this cake, a classic English dessert called a Victoria Sandwich, named after the Queen’s supposedly favorite teatime snack. I know I’ve mentioned several times here that I am not much of a cake person but this could be the cake to totally contradict that statement. The cake itself it mentioned various times on the Internet. The Wednesday Chef just made it but I remember seeing it originally on Orangette titled “busy day cake”.  I don’t know why but I always wanted to try this one out. Perhaps I enjoyed the non-fussy qualities, the fact that it is best by itself, in all of its un-iced glory. I liked how every picture I saw of it seemed to be ethereally light and fluffy. It looked like it was not too sweet, like something that would be perfectly excusable as a breakfast item. It lived up to every visually created extraction I set. It was meltingly tender, wonderfully fragrant of vanilla and nutmeg, and I made it into a perfect springtime treat with the addition of the strawberries and cream (in my honest opinion few things are greater than strawberries and fresh whipped cream). It is simple and humble and, with its enormous sinkage in the middle, it is just ever so pleasantly frumpy. This cake is London in essence.

Victoria Sandwich Cake
serves 12-16
cake recipe from The Wednesday Chef and Orangette via Edna Lewis

Ingredients
1 stick (1/2 cup) softened butter
1 1/3 cups sugar
3 large room temperature eggs
2 tsp. vanilla extract
2 cups sifted cake flour
2 Tbs. cornmeal
½ tsp. salt
2½ tsp. baking powder
¼ tsp. nutmeg
½ cup buttermilk
1 cup heavy whipping cream
8 oz strawberries, washed, hulled, and sliced thin
1 tsp. sugar

Preheat the oven to 375 degrees. Butter a nine-inch cake pan and line the bottom with a parchment round. Butter the parchment too.

In a standing mixer, beat together the butter and the sugar on high speed until fluffy, 3 minutes. Add the eggs one at a time and then add the vanilla. Scrape the bowl to loosen the bits sticking at the bottom.

In a bowl, combine the cake flour, cornmeal, salt, baking powder, and nutmeg. Turn the mixer onto low and add the flour mixture in 3 parts while adding half of the buttermilk in between each flour addition (you should start and end with the flour). Mix until combined. Pour the batter into the prepared pan and smooth the top.

Bake the cake for about 30 minutes until an inserted toothpick comes out clean. The top will brown quickly so you may need to cover it with foil at some point in the baking. Remove from the oven and let cool in the pan for 5 minutes. Invert onto a baking rack and let cool completely.

Combine the strawberries with the sugar and stir to combine. Set aside for at least 10 minutes to allow the strawberries to release some juices. Whip the heavy cream with a mixer or by hand until you have stiff peaks. Once the cake is cool. Use a serrated knife to cut the cake into two layers. Remove the top and set aside. On the bottom layer of the cake arrange the strawberries overtop making sure to pour over the good juices. Spread the whipped cream over the strawberries and place the top layer of the cake over the cream. Dust with powdered sugar. (The cake itself can stay out at room temperature but once you add the cream it needs to be refrigerated. Therefore, I recommend assembling the cake just before you intend to serve it so that the cake can be at room temperature...but its still good cold…at midnight).

Hi, April Favorites

Oy!

I’ve been wracking my brain for the perfect word to describe the past few weeks but that was all I could come up with.

Oy!

Though I’m sure Buh! Gah! or Kwekjfgkgs! could work as well.

Senioritis has come at me full tilt. On more than one occasion this week I have sat at my desk with a book in front of me, intending to do my required reading, yet a strange force prevents my hand from ever lifting up a page. Meanwhile final projects have overtaken my life but luckily I actually have an interest in those so it’s been a good kind of busy. The film festival I worked on coordinating since October started on Thursday and it is finishing up tonight. So hopefully within the next few days the crick in my neck will disappear, my shoulders will no longer represent Quasimodo, my heart won't feel panicky anymore and I will instead be saying 

Phew!

Meanwhile I’d like to give you some links I’ve been stockpiling for the last two months and also want to link you to this recipe here

I made the recipe exactly as Sara did (except I used Mahi-Mahi instead of cod) so I feel no need to repeat it. It’s a great segue recipe from winter to spring. The fish is light, lemony and refreshing and, as my fish craving increase with the rise of warm weather, much enjoyed. But nestled in heap of the polenta, the dish still carries comforting qualities. The leftover polenta can also be baked into awesome little croutons that I sprinkled on a Caesar salad one day and tomato soup the next.

And I will leave you with this…

21 DAYS TIL GRADUATION!

Hurrah!

Stop motion animation is quite possibly the greatest art form there is...especially when it has to do with food.

A modern rustic barn and an amazing ex-brewery loft

Paint for decorating kitchenwares that you apply and bake permanent...nontoxic and dishwasher safe too

Smart puppy and a silly puppy

The coolest people in food

Delicious pantone and eggy pantone

Could be very handy

Is sous-vide cooking genius or cheating?

Edible typography by Anna Garforth (take a look at her other work too, it's amazing)

The cauliflower mash looks like heaven (and of course the chicken does too)

Recently picked up some Belvoir Elderflower Cordial at Williams Sonoma and I plan to make this

and finally, the next ice cream on my to-make list

Chard Cakes with Sorrel Sauce

There’s been quite a lot of anticipation in my life lately, exciting things just around the corner. For starters, two weeks from now is a rather large film festival that I have been planning with a few others since October and I am very excited see the outcome of that (and honestly also excited to not have to constantly think about it anymore). Of course graduation is in 5 weeks as well. I actually bought my cap and gown today. It’s bright purple and looks like a muumuu. I also can’t figure out how to put on that hood thing; it just kind of hangs there stupidly and gives me a constant feeling that I’m choking. Can’t wait to wear that for a 4 hour long ceremony on what will probably end up being a sweltering muggy day. And finally I am also anticipating all of the gorgeous spring vegetables that are slowly starting to appear at the farmers market.

I went to the market last Saturday and was floored by just how many people were out and about. Now that the regular hours have begun (which means many vendors who take the winter off will return) things just feel back to normal. I can do most of my shopping there again, no longer having to resort to the grocery store for imported lettuces and frozen vegetables. I can make a quick stop on Tuesdays to pick up a mid-week loaf of bread or fresh baked cookie. I can also more easily let the season influence my cooking and go to the market without any plans of dishes to make but instead allow the availability conjure up recipe inspiration in the moment.

While I was there I stopped by the stall for Radical Roots, an organic and sustainable community farm that was making its first market appearance of the year. They mainly had spring garden transplants but did have an array of early spring greens. That’s when I saw several bunches of bright green sorrel, one of those mysterious greens that I’ve heard a lot about but never actually tasted. The vendor let me tear off a little piece to taste and I was shocked, but pleased, by its zingy lemon flavor. And then a little trigger went off in my head, a subtle reminder that I had seen this ingredient somewhere recently. But where? Well, Ottolenghi of course, king of all things vegetabley and delicious. I had spotted a recipe for chard cakes with sorrel sauce in Plenty only a few days earlier and the sudden access to this once distant ingredient ensured I would make the recipe immediately for lunch.

The recipe is essentially a veggie burger with a sauce but don’t let that make you think that it’s as boring as that. Remember, we’re dealing with Ottolenghi here. The chard cake is delightfully delicate and tender. That being said it does take a little special care and attention when cooking them. Get a little emphatic when flipping them over and you risk having a pile of grain crumbles rather them a nice round cake. Not to say that the crumbles wouldn’t have the same wonderful earthy, briny, and salty taste as the cakes, but its much more pleasant when they stay together, right? But the key component is the sorrel sauce. Handfuls of the citrusy sorrel mixed with thick Greek yogurt and touch of olive oil, Dijon, and honey, and it is truly something worthy of eating straight with a spoon. Granted it is a tad lip-puckering but once it combines with the savory cakes, the marriage is just dreamy. Top with a fried egg and spring lunch or dinner is good to go.

Chard Cakes with Sorrel Sauce
serves 3
adapted from Ottolenghi’s Plenty

First, this recipe does take a lot of time and dishes but you could probably do some prep work to get ahead if your not making it all in one go. The sauce can be made 2 days ahead of time. You could also begin prepping your cakes by washing and steaming the chard or even making the actual patties a day ahead and letting them sit in the refrigerator until ready to fry. By the way, the sauce is so good I made a double batch and have been pouring it on everything I eat. It would be amazing on grilled vegetables or chicken or, as I did, over a white bean and tuna salad.

Ingredients
for the cakes
a large bunch of Swiss chard
2½ cups cooked and cooled bulgur wheat or other small grain (quinoa would be nice here)
¼ cup pine nuts
1 Tbs. capers, drained
1 Tbs olive oil
3 oz. crumbled feta cheese
1 egg
salt and pepper, to taste
fried egg (optional)

for the sauce
2 large handfuls washed and dried sorrel (more if you like a stronger lemony taste)
¾ cup Greek yogurt
2 Tbs. olive oil
a small drizzle of honey
salt, to taste

Start by preparing the sauce. Put all of the ingredients into a food processor and whiz until it becomes a creamy and smooth green sauce. Taste and add more salt if needed and store in the refrigerator until ready to serve.

Wash your Swiss chard. Remove the leaves from some of the very thick stems (smaller ones are okay) and roughly tear the leaves up. Place them in a pot with a steamer basket and about an inch of water. Bring to a boil and steam until the stems are tender. Remove the chard from the pot and place in a clean kitchen towel. Wring out the leaves to remove as much water as possible. Transfer the chard to cutting board and chop roughly. Place the chard in a mixing bowl and toss with the bulgur wheat.

Heat the Tbs. of oil in a frying pan over medium heat. Add the pine nuts and the capers and fry for about a minute until the pine nuts are just golden. Add them to the bowl with the bulgur and chard and stir. Add the cheese as well. Taste the mixture and add salt and pepper as needed. Then add the egg and stir until well combined. If the mixture is too wet and does not hold together, add some breadcrumbs or even some chickpea flour to thicken it up.

Form the mixture into 9 round patties and place in the refrigerator to firm up for about ½ hour. To cook, heat some olive oil in a skillet over medium heat. Cook the patties in two batches (keep the cooked ones in a warm oven) for about 4 minutes on each side or until golden and hot all the way through. Be very careful when flipping them. Serve three per person as a main course with several dollops of the sauce and, if you’d like, a nice runny fried egg on top.

End of Winter Salad

Six months ago I wrote this, my farewell to summer, optimistic with the prospects of fall activities: football, winter squash, changing leaves, but so sad to leave the fresh vegetables and fruits of summer. I am truly a summer being, a warm-blooded, July-born Leo, and need the sunshine to function on a normal level. That salad was hard to let go. But we’ve made it through with a surprising and wonderfully mild winter. Not once did I break out the snow shovel, not once did our school cancel classes. It was a winter that required merely an extra blanket and a mug of hot chocolate to get through.

Spring came two days ago with a bang, literally. After aweek of nearly 80 degree weather, Mother Nature brought us the new season by means of an almost rite of passage. By 4:00 the winds picked up. By 5:00 the sky grew dark. At 6:00 flashes flickered in the distance and low rumbles murmured through the heavens. I sat on the floor in the kitchen, face peering out the open window and watched the storm unwind. It’s almost a magical moment when you hear the very first raindrop, a resolute patter on the grass that then, in less than a minute, it accelerates to a full-on shower. The storm progressed and just when I thought is was beginning to pass, it happened. A lightening bolt struck literally feet away from our house accompanied by an earth-shattering boom. Surges of electricity pulsated through me and every hairstood up on the back of my neck. It was absolutely frightening and exhilarating and a jolting burst into spring.

So to accompany my end of summer salad I bring you this end of winter salad I concocted last weekend. It’s refreshing yet still hearty, the sort of dish that I don’t think I would mind eating every day. A simple composition of cooked farro and wild rice, tossed with some lemon and oil, and topped with steamed farmer’s market kale, roasted butternut squash, spiced, honeyed walnuts, and a smattering of manchego cheese. It goes well with a glass of iced tea, open windows, cool breezes, and the sounds of chirping birds. I can find no other word for it that just plain lovely. It would be great for a picnic (just pack the walnuts separately and sprinkle on top before eating) but was nice for a special lunch alone too. Though this celebrated some of the last of the wintery foods, the bright kale and citrusy flavors bring with it signs of more gorgeous, sunny weather to come. Hello spring!

End of Winter Salad
Serves 2-3
adapted significantly from this recipe

I can’t wait to try this with more spring-like variations (asparagus, peas, pancetta, and pine nuts would be delicious) but almost any substitution could work. It is very versatile. Also, if you have any leftover grains, be sure to make this. The proportions of this salad and vinaigrette arenot really exact, absolute recipes. Assemble it according to your tastes and proportional preferences and you’ll be happy no matter what.

Ingredients
4 cups cooked whole grains (I used a combination of wild rice and farro. Look to packaging for cooking instructions. I also added a bay leaf to the cooking water for a bit of flavor)
1 butternut squash, peeled and cubed
olive oil
a big bunch of kale, washed and removed from thick stems
manchego cheese slices
salt and pepper

for walnuts
½ cup walnut halves
2 Tbs. honey
¼ tsp ground turmeric
pinch of cayenne
pinch of salt
a dash of water

for vinaigrette
½ lemon, juiced
3 Tbs. olive oil
a squeeze of honey
salt and pepper

Preheat the oven to 400 degrees and start by cooking the butternut squash. Toss it with a little olive oil, salt and pepper and place it on a parchment lined baking sheet. Pop it in the oven for around 30 minutes.

While that cooks prepare the vinaigrette in a bowl. Combine all of the ingredients and whisk until smooth. Also begin to prepare the walnuts by mixing the honey turmeric, cayenne, and salt in a bowl. Add enough water to make a runny paste. Set aside. When there are 10 minutes left for the squash, add the walnuts to the honey mixture, stir to coat them completely, and add them to the pan with the butternut squash off to one side, spreading them in an even layer. Return the pan to the oven until the walnuts are bubbling in the honey syrup and turning golden. While the squash and walnuts finish up, steam the kale in apot with a steamer basket.

Remove the sheet pan from the oven and set aside to cool for a moment. This will let the sugars on the walnuts set and turn crispy. To assemble the salad, add the kale and butternut squash to the grains. Pour overthe dressing and gently toss to combine. Taste and add salt or pepper as needed. Top with the walnuts and some shavings of the manchego cheese.