Funfetti Millefeuille


Spring, at last! Though it was a relatively tame winter (not including that snow storm I happened to miss out on) the sun and mild weather already feels rejuvenating, bringing with it a shift in the winds, the arrival of a new phase.

I realize that I mention this feeling of “rebirth” and starting another revolution of an ever-evolving cycle of life maturation each time spring comes around but it truly does happen. I mean, look at the evidence. 3years ago in the spring, a year out of college and just finding my first “real job”, I was going through a new phase of acclimation. 2 years ago I entered a major phase of personal growth and trying things that I was maybe too scared to try beforehand. And 1 year ago, the spring was the start of a lesson in healing and a long and slow process of realizing that hurt and sadness do indeed go away.


So what about this year? When spring arrived I still wasn’t sure yet. Unlike other years, this spring didn’t start off with a huge change or clear-cut moment defining the beginning of a new phase. That is, until I came across this quote by Emily Dickinson on Instagram of all places.

“The soul should always stand ajar, ready to welcome the ecstatic experience.”

That’s when I realized that the phases of my life these past three years and what I’ve learned from them have all been leading up to this, the stage where I really begin to just start living. It’s almost as if I’ve been spending my time getting to know who I am, deep down to the core and now that I’ve done that, I am free to take risks, be a bit reckless, and just let myself go without risk of losing sight of the self. And that made me excited! So excited I couldn’t help but make a 4 layer cake complete with rainbow sprinkles for Easter dessert this past weekend. Because I couldn’t possibly claim to be living it up to the fullest extent if rainbow sprinkles weren’t involved, amiright. Thus, Funfetti Millefeuille.


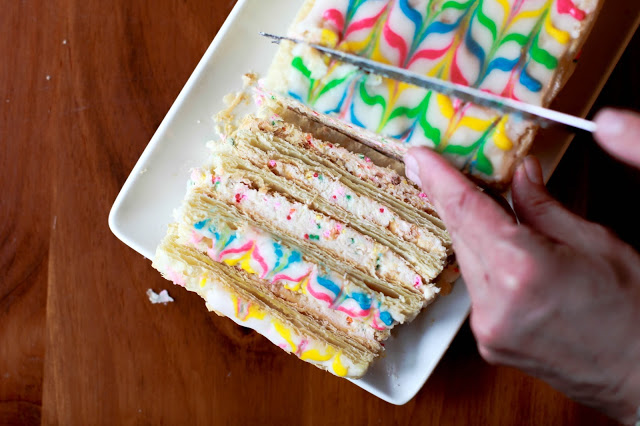
Millefeuille, a classic French dessert meaning “thousand leaves,” is composed of alternating layers of crispy and flaky puff pastry with a creamy custardy filling and a layer of icing on top. It’s best eaten immediately if it’s the crispy texture you crave, but I found it really nice once it softened too, almost éclair-like. This particular version, filled with a rainbow sprinkle-infused sweet mascarpone filling and decorated just as frivolously, is probably as far as you could go in terms of bastardizing the original version, probably causing Julia Child to roll over in her grave with each layer added. But do I care? Nope! Because this looks like springtime and tastes like birthday cake with a sort of cavity-inducing sweetness that can only be complemented by a cup of strong black coffee. So, if it’s ecstatic experiences I‘m opening my soul to this year, well, I’d say I’m off to a pretty good start.


Funfetti Millefeuille
Recipe from Tasting Table

Ingredients

For the Pastry
1 17.3 oz package (containing two sheets) of puff pastry thawed in the refrigerator and cut in half, lengthwise, creating 4 rectangles of puff pastry.
2 Tbs. powdered sugar

For the Filling
2 cups mascarpone cheese
½ cup powdered sugar
1 tsp. vanilla extract
1/3 cup heavy cream, whipped
½ cup rainbow sprinkles

For the Icing
1 cup powdered sugar
2 Tbs. milk
2 Tbs. butter, melted and cooled
2 tsp. corn syrup
red, blue, green, and yellow food coloring

Preheat the oven to 425 degrees. Line two baking sheets with parchment paper. Place 2 rectangles of the puff pastry on each baking sheet and prick them all over with a fork. Use a fine-mesh sieve to dust them on each side with powdered sugar. Bake until golden, 12-15 minutes. Remove from the oven and use another baking sheet to press down lightly on the pastry to flatten them some. Once flattened, transfer the pastry to a cooling rack to cool completely.

Make the filling by combining the mascarpone cheese, powdered sugar, vanilla extract, and whipped cream in a bowl until well blended. Refrigerate until ready to use.

To make the icing, combine the powdered sugar, milk, butter, and corn syrup in a bowl. In 4 small bowls place 1 Tbs. of the icing. Add 2-3 drops of one color of food coloring to each bowl of icing and mix well. You’ll end up with a tablespoon of icing for each color. Transfer each of these to a separate sandwich bag and seal shut. Leave the rest of the white icing in a bowl until ready to use.

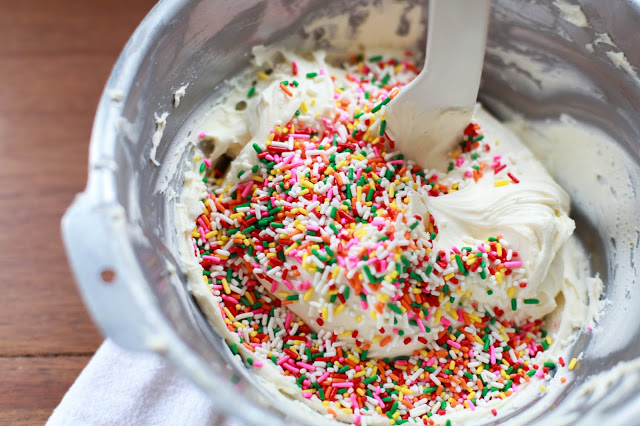
To assemble the millefeuille begin by adding the sprinkles to the filling and mix well. Transfer to a piping bag or a gallon 
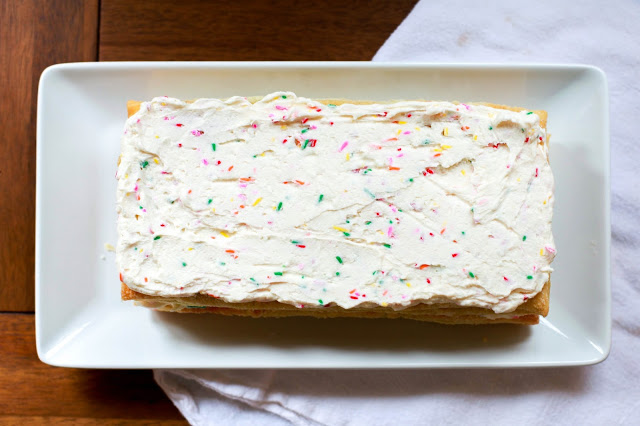
plastic bag with one corner snipped off. Place one piece of the puff pastry on your serving platter. Pipe a third of the filling onto the pastry and spread evenly with a knife or offset spatula. Repeat this step 2 more times. Add the 
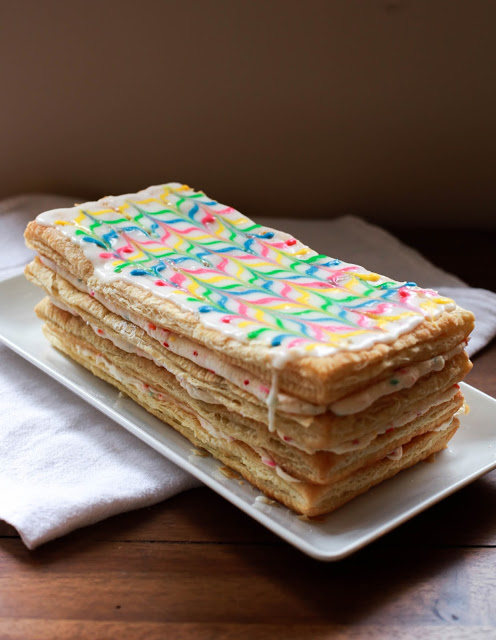
final piece of pastry to the top and use an offset spatula to spread the white icing on the top. Snip the very tip of the bottom corner of each bag of colored frosting and work quickly to pipe thin lines across the top of the cake, alternating colors. Once you’ve covered the entire length of the cake with stripes of colored frosting, use a toothpick and drag the tip across the length of the cake. Do this, alternating direction each time, until you’ve reached the other side of the cake. Slice crosswise to serve.


A Year Ago Today: Loss, Remembering, and Bonnie Butter Cake

On my dad’s side of the family, I don’t think a birthday went by without a celebration at my grandma’s (well, I called her Nanaw) house. If I close my eyes and concentrate just enough, I swear I can almost take myself back there. From turning into her long gravel lane and up to the small house on the hill to the end of the boisterous family affair full of jokes and laughs, I can envision every detail as if it happened yesterday.


---

The candles are lit, the lights go out, all sing, then darkness. If it’s my birthday, the July heat settles thickly in the room, occasionally interrupted by a pathetic breeze that drifts through and rustles the thin white cotton curtains. The dulled sounds of… maybe it’s Jeopardy?… drift in, unwatched, from an adjacent room. Someone switches the light back on and lifts the darkness.

My parents, my sister, aunts, uncles, cousins, and Nanaw all reappear, crammed around the floral vinyl tablecloth-covered kitchen table, most likely doubling up in the chairs to make room for us all. It’s about that time that the all too familiar smell of freshly extinguished birthday candles hits my nose. That smell, Pavlovian in its effect, triggers the only response I know: prepare for cake. And if it’s a birthday at Nanaw’s house, we’re eating Bonnie Butter Cake.


My Aunt takes charge of slicing the cake, divvying it out onto paper plates alongside a massive scoop of Edy’s vanilla ice cream. Nanaw passes out cups of Coke or ginger ale. There’s a 97% chance that it went flat about 2 weeks ago but I drink it anyway. The cake is the same as it’s always been and I wouldn’t have it any other way. It’s buttery, as its name implies, sweet, and fluffy but the real star is the caramel icing, the sort that gets an ethereally thin crispy and flaky shell that shatters as my fork breaks into it. It’s an intense toffee sort of flavor and needs the cake and ice cream to mellow it out a bit.


If I’m lucky, there will be a few slices left that I can wrap up to take home with me. I’ll nibble on it bit by bit, drawing out its existence as long as I can. In the meantime, all of us, dazed in a post-cake coma, continue chatting around the table. I hear stories from my dad and his siblings. We all laugh as they regale us with tales of the antics they got up to as kids growing up on a dairy farm. Nanaw, the last to sit down with her slice of cake and ice cream, sits by quietly, shaking her head occasionally at the rowdy rest of us. We continue for hours, long after the residual bits of ice cream have melted on our plates, yet the sweet taste of Bonnie Butter Cake seems to linger on the palate, a taste I’ll never forget.


---

When Nanaw died one year ago today, I worried that my mind would not be able to move past the memories I had of her in her final years. She was still the same person, of course, but old age and illness took their tolls. But time went on and before I knew it those final images trickled away and the happier memories returned. Memories of the woman who watched as I learned how to ride a bike in her backyard, who watched over me during the summer while my parents were at work, withstanding the countless hours of The Price is Right I put her through. The woman who let me sit in the middle of her old white pickup truck and shift gears when she pressed the clutch (which probably was not legal), who let my cousins and I parade through her garden to find rotten vegetables to make our “witch’s brew” in a 5-gallon bucket. The woman who made us Bonnie Butter Cake year after year because we all knew it wouldn’t really feel like a birthday without it.


Other than knowing that Nanaw made this cake for more family birthdays than I can remember, I hardly know any more about it. Where did she get the recipe? When was the first time that she made it? Was it her favorite cake? I may not ever know the answers, but rather than dwell on the questions I can no longer ask, maybe remembering what I do know is the most important thing. I know that Nanaw lives on in the blood that runs through my veins, in my memories that I have and share with others, and through the things she’s left behind, things like a cake recipe scratched onto an old bit of paper.


Bonnie Butter Cake
Makes one 2-layer cake

Note: the ingredients list for the cake and the entire recipe for the caramel icing is written exactly as it is on my grandmother’s hand-written recipe. Instructions for making the cake were not included so I wrote those on my own.

For the Cake
2/3 cup butter or margarine
1¾ cups sugar
2 eggs
1½ teaspoon vanilla
3 cups Softsilk cake flour (I actually used King Arthur)
2½ teaspoon baking powder
1 teaspoon salt
1¼ cups milk

Preheat the oven to 350 degrees and thoroughly butter 2 cake pans. Cream the butter and sugar together in an electric mixer for 4 minutes on medium speed until it’s light and fluffy. Add the eggs, one at a time, scraping down the sides and the bottom of the bowl after each. Add the vanilla and mix until combined.

Add the flour, baking powder, and salt into a separate bowl and use a whisk to combine. With the mixer on a medium-low speed add a third of the flour mixture. Once combined, add half of the milk. Add another third of the flour, then the rest of the milk, and finally the last of the flour. Turn to a medium speed to fully incorporate for about 15 seconds. Divide the batter between the two cake pans and bake for 30-35 minutes until golden and a toothpick inserted in the center comes out clean. Let the cakes cool in the pans until just warm then transfer to a cooling rack to finish cooling completely before frosting.

For the Caramel Icing

"Mix together thoroughly in saucepan, 1½ cups brown sugar (packed in cup), 3/8 cup milk (¼ cup plus 2 Tbsp.), 3/8 cup shortening, ¼ tsp. salt. Bring slowly to a full rolling boil, stirring constantly, and boil for 1 minute. Remove from heat and beat until lukewarm. Add ¾ tsp. vanilla. Continue beating until thick enough to spread. If icing becomes too thick to spread, add about 1 tsp. cream. Icing for 2-layer cake."

Passion Fruit Frozen Yogurt with Toasted Coconut and Dark Chocolate Magic Shell

Ugh, March. The month leaves a bitter taste in my mouth, not at all influenced by what I’m eating (which for the record is a diet primarily consisting of Cadbury Mini Eggs because that’s what Easter is all about for us agnostics).


The dreary cold month taunts us with a few spring-like days before dipping back into frosty mornings and lifeless grey skies. Unsavory memories emerge from the graves of Marches previous and linger like an impenetrable fog that suffocates me with thoughts of stress, heartbreak, unrelenting politics and loss. The clearer skies of April seem miles away. March calls for a ray of sun to ward away the ghosts of the past and for me, that sunlight comes in the form of passion fruit frozen yogurt


Per usual, my frozen desserts come from the genius that is Jeni Britton Bauer. Her eggless creations allow for a clearer, brighter cream flavor and with her frozen yogurts, the tanginess of the yogurt really comes through without sacrificing a smooth and rich texture.


This frozen yogurt combines my three absolute favorite flavors: passion fruit, coconut, and chocolate.  The small amount of passion fruit juice that goes into the frozen yogurt still manages to permeate it with its intense tropical flavor and the acidity that comes from both the fruit and the yogurt make it more refreshing than a standard ice cream. Toasted coconut gives each bite some satisfying chew and a nutty depth of flavor while homemade dark chocolate magic shell (dark chocolate + coconut oil) tones down the bright sweetness of the passion fruit with a bit of bitterness.


Contradictory as it is, this frozen dessert, with it’s tropical and refreshing flavor, momentarily takes me to a place that is warm and sunny, where my winter coat can collect dust in the closet, and the dark worries and memories of the month can melt away for good. In the midst of March, it’s completely necessary. 

Passion Fruit Frozen Yogurt with Toasted Coconut and Dark Chocolate Magic Shell
Makes roughly a quart

Note: Pure passion fruit juice is a bit difficult to find but should be in the juice section at any Hispanic or Asian supermarket.

Ingredients
½ cup passion fruit juice
1¼ cups whole milk Greek yogurt
1½ cups whole milk
2 Tbs. cornstarch
2 oz. (4 Tbs.) cream cheese, softened
½ cup heavy cream
2/3 cup plus 3 Tbs. granulated sugar
¼ cup light corn syrup
½ cup unsweetened coconut, toasted
6 oz. chocolate chips
2 Tbs. plus 2 tsp. coconut oil

Combine the passion fruit juice and 3 Tbs. of sugar in a small saucepan and heat over medium until the sugar dissolves. Transfer to a bowl and allow to cool.

In another small bowl, combine 3 Tbs. of the milk and the cornstarch and mix to make a slurry. In a large bowl, whisk the cream cheese until smooth. Set both aside.

Combine the rest of the milk, the cream, the rest of the sugar, and the corn syrup in a large saucepan. Bring to a boil, while stirring. Let the mixture boil for 4 minutes. Remove from the heat and slowly whisk in the milk and cornstarch slurry. Return to the heat and let boil for an additional minute.

Whisk the hot milk into the bowl of cream cheese until it’s smooth. Strain through a sieve if it’s a bit lumpy. Whisk in the yogurt and the passion fruit syrup. Transfer the mixture to a gallon freezer bag and close, squeezing out excess air. Fill a large bowl with ice water and submerge the bag with the frozen yogurt base in the ice water for 30 minutes.

Once the frozen yogurt mixture is cool, churn according to your ice cream maker’s instructions. While it churns, combine the chocolate and the coconut oil in a microwave safe bowl. Microwave for 30 seconds at a time, stirring after each round, until all of the chocolate is melted and mixture is smooth.


When the frozen yogurt is finished churning, stir in the toasted coconut. Transfer to a freezer safe container by layering spoonfuls of frozen yogurt with drizzles of the chocolate sauce until all of the frozen yogurt is in the container. You will most likely not use all of the chocolate sauce but this can be refrigerated and reheated for a later use. Place your frozen yogurt in the freezer and let it firm up overnight before scooping. Drizzle with additional passion fruit juice, if desired.

Coconut Sesame Rice Bowls and a Table for One


I recently moved into my own place, a decision that only those not entirely disgusted by watching their paycheck drop into a bottomless pit every month should undertake.  The part of me that can overlook the pains of that, however, thrives in this situation. Quiet solitude may not be for everyone, and as a frequent assembler of people, it’s certainly not what I want all the time, but for the time being this solitary physical space feels very right.

In the month leading up to my move, I dished out at sizeable portion of my savings for apartment staples. You know, things like a couch and a TV so that I can at least maintain my solo nights of Netflix and chill. A dining table and four chairs also took a high priority on my furniture-buying list, because what home would not be complete without a place to eat, right? So now a simple wooden round table with four unabashedly hipster, white plastic bucket-seat chairs divide the space between the kitchen and my TV corner.


I envisioned having bi-weekly dinner parties, filling those four spaces with friends, good food, and hours of storytelling at its finest.  Just as the kitchen table during my childhood was a fundamental place where the family reassembled each night to share the day’s experiences, I desired that my table too would become central to the little life I’m creating here. And yet, eight weeks after moving in, I can probably count on my two hands the number I times I’ve, including on my own, sat at the table to eat.

I’m afraid to say that that I play victim to the monotonous rhythm of the daily eat-work-eat-run-eat-sleep routine. I cook the same handful of go-to recipes, ones that make enough to serve 4-6 and that I heat in the microwaves at work all week. I find that I all too often park myself on a stool at the countertop or on the couch to idly take in forkful after forkful alongside a daily dose of unnecessary and unfulfilling Facebook perusing. Amidst the repetition, the kitchen table remains ignored.


Unfortunately I don’t see this changing too much. My goals of hosting frequent dinner parties were lofty to say the least, though let it be heard that I will gladly welcome anyone who wants to let me cook for them in exchange for bringing the wine. And the reason I find myself turning to the same old recipes month after month is because, well, I like them. I mean, yes, cheesy eggs on toast does get a little old after 4 days in a row but somehow I still crave it pretty frequently. But above all other go-to dishes, the one that stands alone as the meal that I could eat every day for the rest of my life and die happy, is little more than a bowl of rice.

That might be why I’ve kept this recipe to myself for so long. Something about the dish feels inherently solitary. It provides the “wrap yourself in a blanket on the couch and eat while watching Anthony Bourdain or The Bachelor” sort of comfort you want to experience alone, whether you’re feeling lonely or not at all.  It pairs well with contemplation, red wine, and the threadbare pair of leggings you’ve had for ten years. And since it was a dreary sort of day where many may not venture outside of the confines of their homes, it seemed right to finally share it.


It starts with a pot of rice, a 50/50 mix of brown and white rice cooked in Alice Waters’ foolproof method of boiling and then oven steaming. I mix it with kale and coconut that have been roasted with a sesame dressing until crisp and smoky-sweet. It’s seasoned with furikake and sesame seeds and beyond that, this simple rice base only needs a variety of topping options. The simplest add-ons are slices of avocado and sheets of nori which I use in place of utensils to grab onto a clump of rice. It’s not a very graceful way of eating which is probably another reason why I consume this alone. Other options are a fried egg with a runny yolk or chicken, salmon, or shrimp that’s been diced, doused in soy sauce and sesame oil, and sautéed. So tonight, hungry and alone, though not at all lonely, and with a lot of things on my mind for good contemplation, I set my table for one.


Coconut Sesame Rice Bowls
serves 4
adapted from Shutterbean's recipe 

Ingredients
½ cup brown medium grain rice
½ cup white medium grain rice
1/3 cup olive oil
2 Tbs. soy sauce
1 tsp. sesame oil
1 bunch of kale, stripped from its stalk and torn into rough pieces
1½ cups large flake coconut
2 Tbs. furikake rice seasoning
1 Tbs. toasted sesame seeds
salt and pepper, to taste

Topping options: fried egg, avocado, nori, sautéed chicken, shrimp, or fish

Heat the oven to 400 degrees. Bring water to a boil in a large, ovenproof and nonstick pot. Add the brown rice and let the water continue at a low boil, uncovered, for 20 minutes. If you are using all white rice, skip this step. Add in the white rice and cook for 10 minutes. Drain almost all of the water, stir in a splash of olive oil and cover the pot with the lid. Transfer to the oven to cook for an additional 10-15 minutes until dry. Fluff with a fork and set aside.

While the rice cooks, add the kale and coconut to a bowl. Whisk together the olive oil, sesame oil and soy sauce. Add two thirds of this dressing to the kale and coconut and toss to thoroughly coat. Transfer to a sheet pan and roast in the 400 degree oven for 12 to 15 minutes, tossing periodically. When cooked, remove from the oven and sprinkle with a large pinch of salt.


Toss the cooked rice with the rest of the sesame dressing along with the furikake and the sesame seeds. Taste and add salt and pepper as desired. Add in the kale and coconut mixture. Place a portion of the rice in a bowl along with your desired toppings.

Mexican Hot Chocolate for that February Holiday


In the days following this past Christmas, the spam emails that regularly flood my inbox emerged like virtual heart-shaped confetti bombs in rosy reds and shades of pink. A loopy script font informed me that is was almost Valentine’s Day. Wonderful.

I guess you could say that it’s not exactly my thing. In a world filled with those that swoon over Jane Austen romance, I’m the outcast in the corner reaching for the existential crises of Kafka. Though I may not be much of a romantic, it’s not at all that I’m against love itself or the act of showing it. Far from it, in fact! It’s more so the hyper-idyllic representations of what we “should” be doing to show our love, especially on this one specific day, that get on my nerves a bit. My aversion to roses doesn’t help either, I’m afraid.


My Valentine’s Day angst used to come from always being the one without a valentine, though I’m sure many of us been there. But when I finally had that stereotypical Valentine’s Day experience, it was one of those things where a lot of hype and build-up to this romantic holiday led to an underwhelming resolve. I couldn’t help but feeling like I was tricked into doing the same loving things I would normally do in a relationship but spending a lot more money in the process.

As a way to maybe appease the changed but still somewhat harsh attitude I have towards this Hallmark holiday, I now unofficially treat February 14th as Eat-all-the-chocolate-you-possibly-can-in-one-sitting Day instead. Trust me, it makes that invasive scent of roses in the air much more digestible.


This year, I celebrate my version of Valentine’s Day with this cinnamon and cayenne spiced Mexican hot chocolate with vanilla whipped cream. It’s intensely rich and chocolately and almond extract adds those cherry notes that complement the sweet warmth of the cinnamon so well. It’s the kind of hot chocolate meant to be savored and the mug meant to be clutched to the heart with both hands so that the tantalizing scents of the spices dance their way to the nose as frequently as possible.


While I see this drink as the next best thing to a chocolate IV hooked up to my veins, most of you are probably hoping that it will help to defrost my icy frozen heart as well. Any maybe you’re right and later today I’ll be visited by the ghosts of Valentine’s past, present, and future, but for now I’ll happily ride this chocolate high through to the end of the day. Happy V-day errbody.

Mexican Hot Chocolate
Serves 4-6
Adapted slightly from Bon Appetit

Ingredients
3 cups whole milk
3 cinnamon sticks broken into pieces
6 oz. semisweet chocolate, roughly chopped
2 Tbs. granulated sugar
½ tsp. almond extract
¼ tsp. cayenne pepper
pinch of salt
1 cup whipping cream
½ tsp. vanilla extract

Combine the milk and the cinnamon stick pieces in a saucepan over medium-low heat. Allow to simmer for about 10 minutes, whisking occasionally. Whisk in the chocolate, sugar, almond extract, cayenne, and salt. Allow to simmer for about 5 more minutes, stirring often, until creamy and heated through. Whip the cream until it forms stiff peaks and stir in the vanilla. Pour the hot chocolate into mugs and serve with the whipped cream.