Amaretto Citrus Peach Cobbler

Since starting college, summer vacations have taken a drastic turn. They used to be so great: only 2 months long, just enough time to chill out, relax, and have some fun. My friends and I all pretty much worked at the same pizza shop about 15 hours a week. It gave us enough money to go out for ice cream, go to the mall, or take a trip to Hershey Park, leaving enough to slowly build up that college fund. There were just no worries; it was okay to be a kid and be lazy. Then I would throw a culinary camp into the mix and cross-country preseason and I don’t think I was ever bored.

Things are different now. Half of my friends stayed at their school towns to work so I see them once a month. We don’t just relax anymore. It’s about working, making money, figuring out what we are going to do when we graduate in 9 months!!!! And if you are me and don’t start the job search until finishing summer school in mid-June, it’s about a constant stream of “we’re not looking for any summer help” for a month until it's too late.

The scariest part is, the summer “breaks” will just keep getting stranger. In a year, when real life starts, it won’t even be a break anymore. Just another season. The beginning of a time where life is not in a set schedule of school-break-school-break. Many of us will begin new journeys, start careers, move to other states, perhaps. After we all reconvene for the various graduation parties, who knows when my friends and I will all be together in one room again. Gah! Is it just a little obvious I’m freaking about the future?

However, the nice thing about summer is that break or no break, it will come around every year and there are some things that will always be there with it. Notably, there will always be peaches. Come July, the peach trees present to us their perfectly ripened and juicy fruits. The farmer’s markets display them proudly so that even people driving by can’t help but slow down at the sight of rosy flesh peeking out of wooden baskets. Without fail, a day will come where you get a peach so ripe you end your snack with pearls of pink juice dripping down your arm and a ring of stickiness around the mouth. The juice probably missed your plate completely, sending stains across the tablecloth. You may even need to change your shirt. But that’s okay; it reminds you of carefree days long and gone. It reminds you simply that the essence of summer still exists in one little fruit, no matter how much summer has changed.  As long as there are peaches, things will still be okay.

That is why on my birthday a few weeks ago, I wanted a peach cobbler instead of cake. I knew that all of my friends, for the first time in a long time, were going to all be together and things were going to be as close to those summers past as possible. So what better way to enhance that summer nostalgia than with peaches? The filling for the cobbler was a little less standard but I was following Jamie Oliver’s filling recipe so I expected it. He did away with the cinnamon, nutmeg, and fallish flair and replaced it with orange juice, lime zest, and fresh ginger. And I added a splash of amaretto too for a little something extra. Somehow, this remix made it even more festive, made a cobbler that not only hinted but screamed summer. It was zingy, sweet, and juicy with the fluffiest cream biscuits on top. If I could take a bite into high school summer this would be it. This can bring it all flooding back.

Amaretto Citrus Peach Cobbler
Recipe adapted from Jamie Oliver and Orangette
serves 10-14

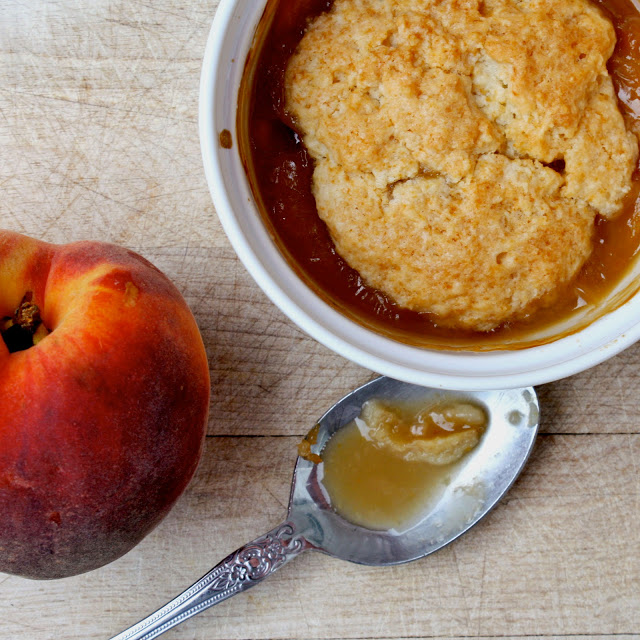
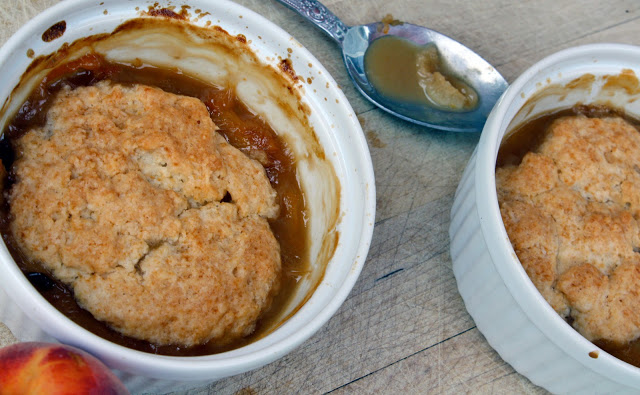
I was making this recipe for my birthday dinner party so there was a lot of cooking going on all day. Of course I wanted it served warm, but since I didn’t want to mess with assembling and baking when guests were present, I made the whole thing a few hours before. I just let it sit a room temperature and popped it in a 200 degree oven about 30 minute before eating to let it warm up. This worked perfectly and the biscuits stayed really crisp and fluffy. Although the pictures show the cobbler in ramekins, I only made 2 of these individual portions. The rest of the cobbler was baked in a large 9X13 casserole dish.

Ingredients
For the filling
12 ripe peaches, peeled and cut into wedges
2 tsp. vanilla extract
¼ cup brown sugar (use a bit less if peaches are really sweet)
zest from one lime
zest and juice from one orange
one inch ginger root, peeled and grated
2 Tbs. amaretto (optional)

For the topping
2 cups all-purpose flour
½ tsp. salt
2 Tbs. sugar
1 Tbs. baking powder
1 stick cold butter, cut into cubes
1 cup cold heavy cream

Preheat the oven to 375 degrees and grease a 13X9 inch casserole dish. In a mixing bowl gently combine the peaches with the vanilla, brown sugar, lime zest, orange juice and zest, ginger, and amaretto. Stir until the brown sugar is melted. Transfer into the dish, spread everything around evenly, and bake for 10 minutes to let the peaches soften some.

While the peaches roast, prepare the biscuit topping. In a food processor, combine the flour, salt, sugar, baking powder, and butter. Pulse until you have pea-sized crumbs of butter. Transfer mixture to a mixing bowl. Pour in the cream while stirring with a fork and continue to stir until the flour is just completely moistened.

When the peaches are finished cooking, remove them from the oven and stir them a little to make sure noting is sticking to much to the edges. Add a little water if they look too thick. Then, place the biscuit dough on top. Take a golf ball size piece of dough and form it into a ¼ inch patty and place it on top of the peaches. Continue doing this, making sure each of the patties have a small gap between one other, until the peaches are covered. You may have a little dough left over; you can use it or not, whatever you like. Bake the cobbler for 20-25 minutes until the topping is golden brown and crispy. Serve warm with vanilla ice cream.

Salted Caramel Ice Cream with Butter Pecans

Is it just me or do other people out there feel like total poseurs when deciding to make a dessert that follows the new supposed fad of combining sweet with salty. Whether is sea salt and caramel, bacon and chocolate, or potato chips and ice cream, this simple flavor combination seems to be taking over the world. So now when I make something along these lines or buy a salted chocolate bar, or whatever, I always think people view me condescendingly saying in their head, “oh, well she’s just following the crowd.” It’s either that or they just think I’m off my rocker, “What does she want salt on her cupcake for?”

Well I think that’s just bogus because as far as I can remember people were eating chocolate covered pretzels, apple pies with cheddar, and green olives with cream cheese (no wait, I think that was just me…) without thinking it was a big deal long before there was a mad rush to start sprinkling French salt onto candy. Our taste buds are programmed to send pleasure signals to our brain when salty and sweet are triggered at the same time. So with that said, I don’t think we can really call ”salty sweet” a fad along the lines of cake pops or macaroons but rather, simply science. Because unlike fads, salty sweet’s culinary phenomenon status and famous implementations are not due to trashy television hype but our ingrained systems of pleasure. Yet, I cannot help but think, will people get fed up with the publicity, get tired of feeling like they’re jumping on the bandwagon with what they eat for dessert. Will salted caramels ever become unpopular sending the likes of Artisan du Chocolat into bankruptcy? Or, is the flavor combo here to stay?

Well I like to think the latter because personally, I cannot get enough of the “oh so wrong but oh so right” sensation on my tongue whenever these flavors collide. So, I WILL keep baking up that combo. Call me what you like; call me a poseur, an obsessed fan, a copycat, or an infringer upon food fads, I don’t care. But, do not call me a failure when I make my desserts because if you could come over right now and try the salted caramel with butter pecan ice cream I have sitting in the freezer right now, I’d have you screaming and jumping up and down like an obsessed fan. You may even wait 60 minutes in line for a scoop. I wouldn’t doubt it.

This ice cream is so unreal, I suppose partially because it is homemade and as far as I’m now concerned that’s the only way to go. But apart from that, it’s flavor is so joltingly different, so unique and contrasting to what your used to that you. You can’t help but digging in for bite after bite with that ever-lingering question in your mind saying, what is it about that ice cream that is sooo good? Well, it’s the salty sweet my friends. It's the deeply caramelized sugar, cooked just to the point where it has a slight burnt taste, but one that you actually enjoy, like toasted marshmallows. It’s the salt, imbedded throughout, that hits you in the back of the tongue just after the sweet registers, creating this dueling tap-dance of tastes in the mouth. But then, there’s also those toasted pecans, enrobed in salted butter, that add body and crunch and, like the caramel, a deep smoked flavor.

It kind of satisfies everything you could ever want in one bite. It’s refreshing in the summer but I’d imagine it would be absolutely comforting in the fall and winter by itself or plopped on top of warm apple pie. Because oddly enough, the rich buttery caramel flavor brings warmth to the cold ice cream, yet another pleasing contrast to this dessert. I wish is could have a self-replenishing stock in the freezer because I don’t want it to end. But no fear, another batch would only be an hour of work and a quick churn away. May salty and sweet never die.

Salted Caramel Ice Cream with Butter Pecans
Ice cream recipe by Jeni Britton Bauer
makes 1 quart

The recipe is a little daunting because there is a quick meander into the world of candy making and cooking sugar. But it just involves a good read of instructions, proper preparation of ingredients, and a quick hand. Never fear, just go for it and if you’re confident, it should turn out great.

Ingredients
For the pecans
1½ cups pecan halves
1½ Tbs. melted butter
1/8 tsp. salt

For the ice cream
2 cups whole milk
1 Tbs. plus 1 tsp cornstarch
1½ oz softened cream cheese (3 Tbs)
3/8 tsp. sea salt
1¼ cups heavy cream
2 Tbs. light corn syrup
2/3 cup sugar
2 tsp. vanilla extract

First prepare the pecans. Mix the pecans with the melted butter and salt and mix to coat evenly. Lay them on a sheet pan and toast in a 350-degree oven for 8-10 minutes. Let them cool completely and chop into small pieces. Set aside.

Now prepare the ice cream. Mix 2 Tbs. of your milk in a small bowl with the cornstarch until you have a slurry and set aside. Mix the cream cheese with the salt in a large bowl and whisk until smooth. Mix the heavy cream with the corn syrup in a Pyrex liquid measuring cup with a pouring spout. Finally prepare an ice bath in a large bowl.

Pour the dry sugar in a large saucepan and set over medium heat. Have a heat-resistant spatula ready. Watch over the sugar and when you start to see the melted sugar underneath spouting out, gently push the dry sugar to the center of the pan to melt. Once completely melted, the color should look like an old copper penny. Continue to heat and gently stir. When the sugar all of the sudden starts to rapidly bubble and send up smoke, remove the pan from the heat and carefully add ¼ cup of the cream and corn syrup mixture, stirring constantly. It will splatter some so be careful. Once incorporated, slowly stir in the rest of the cream.

Once fully mixed, return the pot to a medium high heat and add the milk. If any sugar hardened on the spatula, it will melt into the mixture as it reheats. Bring the mixture to a boil, and let it boil rapidly for 4 minutes. Remove from the heat and slowly whisk in the cornstarch and milk slurry. Return to the heat for another minute, stirring constantly until slightly thickened. Remove from the heat.

Pour the caramel mixture slowly into the cream cheese while constantly whisking so that the cheese is fully and smoothly incorporated. Once everything is added, stir in the vanilla extract. If need be, strain the mixture through a mesh sieve. Pour everything into a large Ziploc freezer bag, seal, and place in the ice bath for 30 minutes, or until fully chilled.

Once chilled, freeze the mixture according to the ice cream maker’s instructions. When the ice cream looks like it is almost done (about 15-20 minutes), add in the pecans and continue churning until just combined. Transfer the ice cream to a container and store in the freezer at least 4 hours before serving.

Whole Wheat Hearth Bread

Everything has been leading up to this for a while now.

Ever since I discovered St. John Bread in London and their phenomenal loaves of brown bread, so chewy and crusty that you would never guess it came from whole grains, I’ve been meaning to introduce myself to the world of healthy bread baking.

Since then I took a class in school about cooking and ingredient science and found myself fascinated by the amazing lives of microscopic yeast. I also bought whole wheat bread at the farmer’s market hoping for a hint of the St. John breads I left behind. But the loaves I received from the market hippies were, although good tasting and chock-full of millet, flax, and sprouted things, were very dense and crumbly, lending no chew or dexterity and leaving me fishing out broken-off pieces burning at the bottom of the toaster. And I wouldn’t even attempt spreading peanut butter on them unless it was a mass of sticky crumbs I craved rather that a piece of sturdy peanut butter toast. So finally, out of sheer desperation for a decent slice of bread I stood in line at the bookstore with Peter Reinhart’s Whole Grain Breads in my hand and determination in my heart. And at last, I discovered the secret to the best whole grain hearth bread.

Unfortunately, this is bread baking with a lot of science behind it which of course means that it’s not a bread that’s is going to easily come together in an afternoon. This is bread that makes you wait, but boy is it worth it. This was my first delve into the long, slow fermentation process and also my first attempt at making bread with a biga and a soaker. I was nervous, really hoping not to screw things up after waiting for so long but was highly pleased with how simple the process ended up being and of course with my final result.

The bread I made, a transitional hearth bread boule, was only half whole wheat, which is the recipe Reinhart suggests for beginners, but had all the aspects of whole wheat that I really love. There was no hint of the mealiness that disappointed me previously because the long fermentation really let the gluten relax and become super elastic. Therefore, the final bread was absolutely moist and chewy, full of complex nutty flavors and a pleasing slightly sour tang. The crust was perfection and even though I was only using a standard oven, baking on a preheated pizza stone and making a steam bath in the oven let the dough spring up fast and develop that awesome crispy exterior. I took the blistered round from the oven and listened to the crust popping and cracking like the applause from an admiring crowd or fireworks blasting off in my achievement. I photographed it as if it was my first-born child, carting it around and showing off my “baby”. Taking that loaf out of the oven may be my proudest of my culinary life and we ate big slabs of solely bread for dinner. It was a perfect meal.

Transitional Hearth Bread
Makes one boule, two batard, or 4 mini baguettes
Recipe by Peter Reinhart

This is not the sort of cooking I am doing every day but I do hope that at some point of my life, this bread baking will be a more daily occurrence. I hope to soon try more of these whole grain recipes like the sandwich loaves, focaccia and pizza dough, and bagels with just as great of results. This bread would be perfect with wine, good cheese, and some select best friends; it makes me feel like the people in Kinfolk Magazine, my new favorite read. It make me feel one step closer to the sustainable, artisan person I strive to be and brings me closer with my food. It makes me trust my intuition, letting my hands determine if the dough is right rather than the recipe. It makes my house smell like heave too…definitely not a bad thing. So bake bread, share bread, enjoy this art.

On Day One
The first day, prepare the biga and starter, which will be used in the final dough on the second day. This will not take too long.

Soaker

1¾ cups whole wheat flour (227 grams)
½ tsp. salt
¾ cup water (170 grams)

Mix all of the ingredients together in a bowl for a minute until the flour is completely hydrated and form the dough into a ball. Cover the bowl with the soaker with plastic wrap and leave at room temperature for 12-24 hours. If you go longer then 24 hours without using the soaker, place it in the refrigerator for up to 3 days and remove it from the refrigerator 2 hours before using.

Biga
1¾ cups unbleached bread flour (227 grams)
¼ tsp. instant yeast
½ cup plus 2 Tbs. room temperature water (I needed a little more because it was a very dry day)

Mix the ingredients in a bowl with a wooden spoon to form a ball. With wet hands, knead the dough for 2 minutes until all of the flour is hydrated and the dough feels very tacky. Let the dough rest for 5 minutes then continue kneading for one more minute with wet hands until the dough is smooth but still tacky. Place in a clean, lightly oiled bowl and cover with plastic wrap. Refrigerate the dough for at least 8 hours before using and up to three days. Remove from the refrigerator 2 hours before using.

On Day Two
This is shaping and baking day. Two hours before beginning, remove the biga from the refrigerator to let it come to room temperature.

Final Dough
All of the soaker
All of the biga
3½ Tbs. whole wheat flour
5/8 tsp. salt
2¼ tsp. instant yeast

Chop up your soaker and biga into 12 equal pieces each, dust them lightly with flour so they don’t stick, and place them in a mixing bowl. Add the flour, salt, and yeast to the bowl as well. Using a wooden spoon, begin to combine the ingredients vigorously and when they start to come together, knead the dough with wet hands for 2 minutes or until the ingredients are evenly distributed. It is easy to tell when this is done with the transitional recipe because you will no longer see any marbling from the two different flours but only even, light brown dough with no granules of yeast showing. You may need to add more water or flour to end up with dough that is soft and slightly sticky. I needed more water because it was a dry day.

Continue kneading the dough on a flour-dusted surface for an additional 3-4 minutes, incorporating only as much flour as you need to make dough that is smooth and tacky, but not sticky. Form the dough into a ball and let it rest for 5 minutes. Prepare a clean, lightly oiled bowl. Knead the dough for one more minute, adding water or flour as needed until soft and supple. Form the dough into a ball, place in the bowl and roll around to cover with oil, cover the bowl with plastic wrap, and let rise as room temperature for 45-60 minutes.

After rising, shape the dough and prepare the oven. Preheat to 500 degrees. Place a baking stone in the lower third with a metal or cast iron sheet pan in the rack directly below it. Let the pans preheat for an hour before baking. Shape the risen dough into a boule. To do so, remove the dough from the bowl, gently pat it into a rectangle, and bring all four corners to the middle, squeezing them together to seal while pulling more dough in from the sides to tighten. Flip the dough over, seam side down, and continue pulling the dough downward into the bottom center with the sides of your hands while turning the dough into a very tight and round. Place on an overturned metal baking sheet with parchment or a well-floured pizza peel, cover with a towel, and let rise for 45-60 minutes.

When done rising, slash the top of the boule in a star pattern with a serrated knife and gently loosen it from its surface. Prepare a beaker filled with one cup of hot water. Then, working quickly, open the oven, slide the dough from the pan and parchment or peel onto the hot baking stone, pour the water into the baking pan underneath the stone, and close the oven door. Lower the temperature to 450 degrees. Bake for 20 minutes, without opening to door, then give the bread a 180 degree turn. Bake for an additional 15-30 minutes until the crust is dark and crackling, the bottom sounds hollow when tapped, and the interior registers 200 degrees. Cool on a rack for at least an hour before cutting.

Birthday Weekend and Volt Restaurant

This past weekend was one of the best I can recall in quite a while. It was the weekend of my 21st birthday and was filled with day after day of extraordinary eating. I mean, what better excuse to gorge on extraneous amounts of rather unhealthy yet delicious things than it being you birthday. Its just one of those times you have to live a little.

I had a great party at my house on Friday where friends and family came over for eating and celebrating. I cooked up a Southern feast (because I am crazy and actually like to cook my own birthday dinner) complete with chicken and andouille gumbo, cucumber and sour cream salad, southern pecan and apple salad, and an amazing citrus peach cobbler (recipe to come). 

Saturday, my actual birthday, was very special because my sister Nia came home from Boston for the weekend. We had awesome Mexican food at La Sandia Restaurant along with a pitcher of Sangria (my first legal drink!) and though my belly was full of shrimp enchiladas and grilled plantains all day, I still saved room for an evening snack of sourdough, Robusto cheese, and fig and walnut butter. But that’s not all! Nia and I also made strawberry buttermilk ice cream that evening from Jeni’s Splendid Ice Creams (my birthday present from her) that we devoured as our late-night movie snack.

But the best eating of the weekend took place on Sunday when my mom, dad, Nia, and I went to brunch at Volt Restaurant in Frederick MD, acclaimed restaurant of Top Chef’s runner up, Bryan Voltaggio. I’ve wanted to go for ages so I figured my 21st birthday would be an amazing opportunity to finally go. And although they offer great things for both lunch and dinner, I had to choose brunch, my favorite meal of the day where sweet meets savory for some of the most innovative and delicious food out there.

Volt is stunning inside and out. Inside the old brick building is a modern and sleek interior, both very classy and elegant yet with slightly masculine and rustic touches. Walls and linens are bright white while the ceilings are painted chocolate brown. Modern geometric light fixtures hang down, lighting the rainbow colored graphic prints on the walls, each portraying the various shops and restaurants in downtown Frederick. And servers, though dressed in white shirts, black pants, and ties, walk around in Converse sneakers. The atmosphere was very relaxed yet little did I know I was about to receive the most attentive and flawless service I could imagine.

Although our meal was a three-course prix fixe with six starters, seven entrees, and four desserts to choose from, we still received a plethora of food outside the main meals. We were first served fennel pollen dusted bread sticks to munch on as we perused the food menu and I sipped on my celebratory glass of champagne. Later, we got to pick from the breakfast breadbasket. This was a hard decision with about six breads to choose from. But, with the four of us plus a double dip into the basket between main course and dessert, we managed to try all of them but one. My first pick was the bacon and sage biscuit, a light a fluffy number speckled with huge pieces of apple wood smoked bacon. My second choice was sweeter, a citrus scone filled with lots of lemon zest and topped with a crunchy sugar crust. Both, smeared with local butter, were so delicious. And if that wasn’t enough, we also could not resist ordering the maple bacon doughnuts off the accompaniments part of the menu so we could each have a taste of this salty and sweet delight.

But finally, our menu items arrived with a brigade of four servers and they swooped the plates in front of each in our party at the exact same moment, landing between our always refreshed and replaced silverware. Our wonderful waiter then would go on to explain the details of each of our dishes before leaving us to indulge. For the first course, I chose the goat cheese ravioli made with black squid ink pasta and local Cherry Glen Farm goat cheese. Surrounding the perfectly al dente rounds were kernels of charred sweet corn and Miatake mushrooms and a balsamic brown butter sauce. Though rich and creamy, the dish was just enough, leaving my taste buds satisfied but my stomach still ready for the many more things to come. The other notable starter was Nia’s. She ordered Bryan Voltaggio’s signature “Spring Garden”, and array of beets, greens, carrots, other vegetables, dressing, and coffee grounds arranged to resemble a garden in the dirt.

I was also extremely satisfied with my main course. Most times, when I go to a fancy restaurant, I tend to order fish just because we don’t make it much at home so it is always to treat to get it. And, I trusted that in a restaurant like Volt, it would be a really fresh and good quality fish, cooked just right. I was right to assume this because it was one of the best pieces of fish I’ve ever eaten. I ordered the halibut, served alongside a farro and spring bean risotto, tomato fondue, and anise hyssop. The salty crust on top of that piece of fish was unbelievable and I held each bite in my mouth, savoring the juiciness and the terrific flavor. The accompaniments were delicious as well, mild enough to let the fish shine while still aiding in enhancing its flavor.

As we waited for the dessert, I was yet again presented with another unexpected part of the meal, a special birthday dessert, complete with candle. Funnily enough, it actually turned out to be my favorite dish of the entire meal. It was a mini vanilla bean and pistachio semifreddo, flavored with chocolate flecks and orange zest and set in an elegant spiraled mold. I guess since I’ve been experimenting with ice cream lately, I was even more excited by this, but nonetheless, its taste was almost indescribable and I will definitely be experimenting with these flavors in the future. The texture was different than ice cream, icier yet also denser and more custardy. It was light and not too rich so it served as a refreshing palate cleanser before second dessert.

Finally, among the four of us, we ordered three of the four desserts (no one got the cheese plate for dessert) so we all shared and got to try these amazing confections. We also got a cafetiere of Highlander Grogg coffee to accompany the desserts, a sweet butterscotch flavored coffee that was strong and absolutely delicious. For dessert, Nia ordered a rich goat cheesecake paired with black raspberry sorbet, almond crumbs, a citrus cookie, and rhubarb cookie. My parents got the peach tarte tatin, served with mascarpone ice cream, cinnamon pudding, crème fraiche, and few other droplets of sauces. They really enjoyed this as a refreshing a seasonal way to end the meal. But I could not resist the dessert called “textures of chocolate” which turned out to be a gastronomic piece of art and yet another inspiration for my lifelong goal of going to pastry school. Amongst a snaking strip of chocolate mousse were pools of chocolate caramel, cocoa nibs, chocolate ice cream, chocolate dust, and burnt chocolate crisps. It was so rich yet I ate every bite, not daring to leave any bit of this amazingness on the plate. Finally, as the last plates were cleared, we each received a gift bag to take home, filled with a fresh blueberry crumb muffin.

My 21st birthday brunch was a meal that I will remember for the rest of my life. It was spent with those that I love while eating wonderful food. I can’t think of anything better.

Vanilla Ice Cream

I’ve had this cooking problem for about two years now. It started about the time I really began building up my cookbook collection and delving in the vast ocean of food blogs that I now follow most diligently follow. The problem was, most of these books and blogs featured recipe after recipe for the most innovative and delicious looking ice creams. And let me tell you now, if presented with an array of fabulous desserts, I will always choose ice cream. I would see these recipes and immediately start reading through the ingredients, my heart racing with delight and excitement. I fervently continued, completely absorbed in the directions until I reached this line: “freeze mixture in ice cream maker according to manufacturer’s instructions.” Wham! Nothing kills a food buzz quite like suddenly facing the maddening and sad truth that you do not have an ice cream maker.

I have considered buying one for a while. I came extremely close last summer but a little voice in the back of my head kept reminding me that I would soon be studying abroad, then it would be winter, and finally I would be living in a dorm room. What good would an ice cream maker do then? But this summer, I had to succumb. The store-bought stuff just wasn’t cutting it anymore, especially after having spent four months in London eating this at least once a week. I couldn’t take those foamy, airy, flavorless excuses for homemade ice cream anymore. Plus, with the prospects of moving into an apartment this fall, with my ever-handy KitchenAid in tow, what was to stop from finally buying that essential piece of equipment?

Well, nothing. So now I have it, the KitchenAid ice cream maker attachment and it might just be the greatest thing I have ever used and my new favorite tool in the kitchen. I got is as an early birthday present (it’s summer right now…why wait to make ice cream) and I have already fallen in love with it. It works amazingly, and now sits in my freezer awaiting a future batch. For my first experimentation with ice-cream making, however, I decided to go for something simple. As hard as it was to avoid bizarre flavors and fun mix-ins, I retrained myself and settled for good ole vanilla. But, I found that plain vanilla, when made at home with good ingredients, was not in the least bit plain.

The recipe used both real vanilla bean (so expensive but so worth the price) and vanilla extract, lots of heavy cream and egg yolks, and sat overnight in the refrigerator to let the flavors develop and mature. What resulted was a vanilla ice cream like I’ve never tasted before. It was so rich and, well, vanilla-y. The amount of vanilla provided this slightly alcoholic taste that was pleasing and sophisticated and, after churning and hardening in the freezer for a few hours, the final result had a smooth and creamy texture. It was also dense yet still light on the tongue and sent my eyes rolling into the back of my head in bliss with every spoonful. With a successful first try, I have a feeling that I’ll be developing a little bit of an obsession here this summer. Many more ice cream recipes to come.

Vanilla Ice Cream
The recipe is exactly as David Lebovitz wrote it on his website. I didn’t want to mess around on my first try and trusted his recipe to lead my in the right direction. I was right to assume he knows what he is doing since it turned out so great. I did have a little mishap at first. After heating the milk and sugar, I added the vanilla and vigorously tried to disperse it in the mixture. I think this was a mistake since the milk immediately curdled. I guess vanilla must have a lot of acid. So on the next try I simply scraped in the seeds and let them sit in a clump, not stirring them around until after they sat in mixture for an hour. I guess this let the milk temper with the acid so when I stirred it later, the milk did not separate.

Ingredients
1 cup whole milk
¾ cup sugar
pinch of salt
½ vanilla bean, split lengthways
2 cups cold heavy cream
5 large egg yolks
1 tsp. pure vanilla extract

In a sauce pan, combine the milk, sugar, and salt and heat on low until steaming and the sugar is dissolved. Using a paring knife, scrape the vanilla seeds into the milk mixture and then toss in the empty pot. Give the mixture a brief stir them remove from heat and let sit for an hour.

In a separate bowl, mix together the egg yolks. Once the milk mixture has sat for an hour, return it to a low heat to warm it up some. Add a little bit of the warm milk to the egg yolks and mix to slowly bring up their temperature. Do this a few times. Then, slowly pour the eggs yolks into the milk mixture, whisking constantly.

Continue to cook this custard over a low heat, stirring constantly with a rubber spatula so that is does not burn on the bottom. The mixture will slowly thicken and it is done when it is able to thickly coat the back of the spatula. Meanwhile, pour your cold heavy cream into a bowl and set this in a larger bowl filled with ice water to keep the cream very cold. Place a strainer over the bowl of cream. Once the custard has reached a thick consistency, pour the mixture through the strainer straight into the cream. Stir the custard with the cream until cool. Add the vanilla extract as well as the pieces of the vanilla pod left in the strainer and stir to combine. Place plastic wrap directly over the custard in the bowl and refrigerate overnight.

The next day, remove the vanilla bean from the mixture and freeze in an ice cream maker according to the manufacturer’s instructions. Transfer to a container and let freeze for a few hours until hardened.