Corn for the Gold

It’s amazing to consider the epic change that occurs amongst the world’s inhabitants every two years. Suddenly people like me, who don’t outwardly show much pride in their country on a normal daily basis, are standing in front of their television, pumping their fists, and shouting Go! Go! GO! USA! USA! Suddenly I don’t mind watching sports in the least bit; I actually enjoy it and take the time to really appreciate and admire the skills and extraordinary physical fitness of the athletes, our real-life action superheroes. And suddenly, fun stories like these arrive on the Internet.

I’ve been slightly bitter about the Olympics this time around, however. The incessant and ever-constant images of London, my second home, on the TV screen bring out this intense yearning that pulls at my very heartstrings. I’m unnecessarily jealous of all of the American tourists that are there while I am not. Though I know it is currently a very different London right now than I probably remember, I’d do anything to be there all the same. Yet despite my affections for the host country, I am still automatically rooting hard-core for the American athletes and getting slightly emotional whenever they play our national anthem at a medals ceremony. What can I say; the Olympics bring out different sides of people.

For example, they make me want to do things like work out more (though I think that applies to everyone) or take up hobbies like archery or skeet shooting. Also, counterproductive to the previously mentioned urges, they really make me want American food, as if summer didn’t already create that craving. So to embrace these few weeks of hyper-Americanism, I am cooking and eating in the fashion of the US of A. It’s BLT’s for lunch, burgers for dinner, and a craving for all things barbeque. And of course you can’t have American cuisine with out the summer favorite, those golden ears of milky and juicy sweet corn.

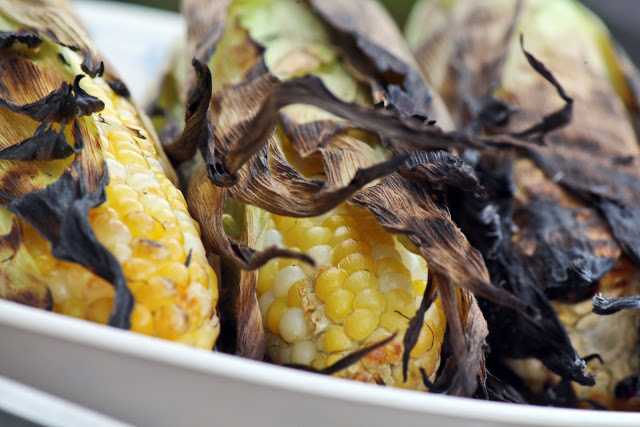
Just last week I had grilled corn for the first time ever. I placed the ear or corn on my plate, not thinking twice about the blistered and blackened kernels, freckling the cob with a gap-toothed grin. The remaining kernels, on second thought, looked different too. Were they deeper yellow than I remembered, a glistening golden hue almost shimmering like the light of sunset?  One bite was enough to inform me that this corn was on a totally different playing field than its boiled or steamed alternative. Grilling corn somehow intensifies the flavor by a tenfold. It’s sweeter, but not overwhelming; it’s a sophisticated sweet. It’s like caramel that has been cooked to the point right before it begins to burn where it becomes concentrated and smoky. The individual kernels swell with steam and boiling juices so that this caramelized liquid bursts the moment it hits the impact of the teeth. I unashamedly sucked the juices from the empty cobs to savor every bit of the new and mind-blowing flavor. From now on, it’s so long to boiled corn. Grilling is my method of choice now.

Its amazing how roasting and grilling, that high heat and that little bit of fire and smoke, can turn what may be a perfectly delicious vegetable or fruit into something that just simply goes above and beyond. It creates the Olympic athletes of food, with flavor that, like the athlete’s skills, seem almost beyond possibility. And it may just me my own opinion, but I think that grilled corn gets the gold every time.

Grilled Corn (and an optional salad preparation)
Ingredients
3 ears of corn with husks attached

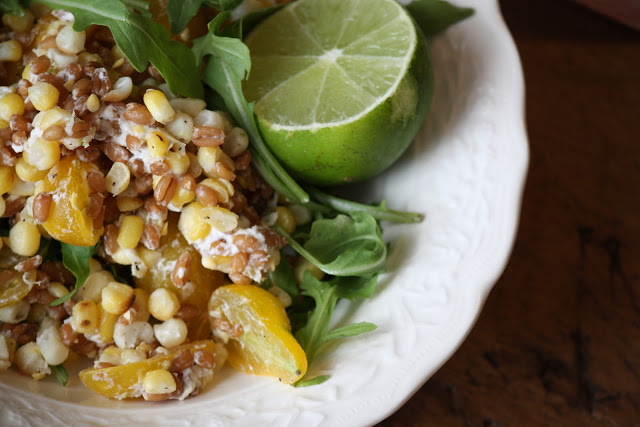
for roasted corn and goat cheese salad
(serves two)
corn cut from the 3 ears
2 Tbs. softened butter
salt and pepper
¼-½ tsp of cumin
zest of half a lime
½ cup cherry or pear tomatoes, halved
¼ cup goat cheese
½ cup dry spelt or other grain of choice, cooked according to package instructions
a handful of arugula
juice of half a lime

Soak the corn in water for about 15 minutes. Then after taking them out and shaking them dry, carefully peel back the husk of the corn down to the bottom so that they remain intact and pull off the inner silks. Brush the corn with a little olive oil and pull the husks back up. Place the corn onto a preheated grill with a medium flame. Cook for 15-20 minutes, turning occasionally. While the corn cooks combine the butter, salt, pepper, desired amount of cumin, and lime zest in a bowl and mash into a paste.

Once the corn is cooked, remove from the grill and place onto a platter. Carefully peel back the husks and brush the butter mixture onto the hot corn. You can also place the naked corn back onto the grill for a few more minutes if you want more caramelization. Remove the husks completely and then cut off the kernels of the corn into a bowl. Add the tomatoes, goat cheese, grains, arugula, and lime juice to the bowl and toss to combine. Add any additional salt and pepper to taste.

Summer Vegetable Tart

For almost a year now I’ve been taking part in Meatless Monday. I think I originally heard about it from an article about how Mario Batali made all of his restaurants have meatless menus on Mondays but regardless it instantly became something I wanted to do. I know for a fact that I would never totally convert to vegetarianism. And it’s not just because I like the taste of a nice juicy hamburger (though that plays a rather large part) but I think I really feel better when I eat meat in moderation.

About a year and a half ago when I was living on my college campus right after my study abroad in London ended, I did not eat very much meat. For one, the meat at our dining halls was highly dubious and I refused to touch it. Secondly, I had been reading and watching a lot of documentaries at that time about the meat industry and the treatment of these feedlot animals. You could call it my 3-month animal rights stage I guess. But I realized that without that high dose of protein in my meals I would feel sluggish and tired. I needed that steak, that chicken, that pork chop. I guess I quickly got over my activist stint and got right back to consuming the stuff but this time with a new awareness and sense of selectivity. I ate a lot more local, organic, grass-fed and humanely treated meat. It tasted so much better and despite its much higher cost, I didn’t mind because I knew it was the right thing for the environment and me.

Now, I am a bit more lenient and less particular but I have made a conscious effort to go at least one day a week (it usually ends up being about 3) without meat. It’s amazing to read the statistics about the difference we as Americans can make if we just cut out meat one day a week. The more people that take part in Meatless Monday the less health problems we will have with our bodies and the less greenhouse gasses, fuel waste, and so many more problems we will have on this earth. Sorry if I sound a little soapbox-ish here but I think it’s a simple thing that is easy for everyone to try.

I am lucky that the restaurant if work at is closed on Mondays and I can spend the day planning out a good meatless meal for that evening. And I’ve surprised not only my family but also myself at the variety and deliciousness I can achieve. I’ve made “hamburgers” out of brown rice, olives, and pecorino cheese, a Mexican lasagne out of tortillas, garden vegetables, ricotta, and salsa, baked white beans, and of course a number of egg dishes.

A few weeks ago I made this awesome quiche/tart. It’s a good way to use up some extra zucchini we all have laying around and it all comes together quite easily. You can wash up while it bakes in the oven with time leftover to relax and read a bit while it finishes off. I can imagine you could also make it ahead of time too. The crust may be a little softer but you could certainly revive it some in the oven. I had a slice the next day for lunch and I just heated it in the microwave…it was still awesome. With a dish like this and a nice salad on the side (or the chilled dressed green beans I made, recipe below) you should have no problems sticking to Meatless Monday at all.

Summer Vegetable Tart
adapted from New York Times
serves 4-6

Ingredients
1 sheet of puff pastry, thawed
2 Tbs olive oil
1 pound Swiss chard
1 medium onion, finely chopped
1 medium zucchini, chopped
1 tsp chopped thyme leaves
1 tsp chopped rosemary
4 eggs
½ cup tightly packed shredded cheddar cheese
¼ cup plain yogurt
¼ cup milk
salt and pepper to taste

preheat the oven to 375 degrees. Roll out your puff pastry on a lightly floured surface until 2 inches larger in diameter than your tart pan on all sides. Place the pastry over the pan and press into the pan along the bottom and up the sides. Cut off the excess and discard or reserve for another use. Prick the dough on the bottom of the pan with a fork and place in the refrigerator until ready to use.

In a large skillet, heat the olive oil over medium heat. Separate the Swiss chard leaves and stems. Finely chop the stems and give the leaves a rough chop. Add the chard stems and the onion to the skillet. Season with salt and cook, stirring occasionally, for 5 minutes. Add the zucchini and cook another 10 minutes until the zucchini is soft. Add the rosemary and thyme, stir, and add in the chard leaves. Continue to cook and stir until the leaves are wilted and tender, about 3 more minutes. Remove form heat and set aside.

Crack the eggs into a mixing bowl and whisk well. Add the cheese, yogurt, and milk (if you don’t have yogurt on hand just add ½ cup milk) and whisk to combine. Add the cooked vegetables to the egg mixture, season with salt and pepper, and stir well. Pour the filling into the chilled puff pastry. Spread the filling even with the spatula and bake for 45 to 50 minutes until firm and golden. Allow the tart to cool for at least 15-20 minutes before eating. Can also be served at room temperature.

Dressed French Beans
recipe from Jamie’s Dinners by Jamie Oliver

Ingredients
4 giant handfuls of washed French beans, with the ends snapped off
2 heaped tsp Dijon mustard
2 Tbs white wine vinegar
7 Tbs extra virgin olive oil
salt and pepper
1 Tbs capers (optional)

Bring a large pan of water to a rapid boil. Toss in the beans, stir, and cover until the water returns to a boil. Remove the lid and cook for 4-5 minutes. Meanwhile prepare a large bowl of ice water. Once the beans are cooked, quickly drain them in a colander and transfer the drained beans to the ice water to cool and stop cooking. Once cool drain them again and set aside to dry some. Meanwhile add the mustard, vinegar, oil, salt, pepper, and capers, if using, to an old jam jar, pop on the lid, and shake until well combined. Alternately you could whisk together in a bowl. Place the beans in a large serving bowl and pour over the dressing. Mix well to dress the beans. Serve immediately or place in the refrigerator until ready to eat. Remove from the fridge about 30 minutes before eating to allow the beans to come to room temperature.

Zucchini (and lots of other stuff) Muffins

This year is the first (in many) that my family put a garden in our yard. As a kid, I always remember having one. It was enormous and a mainstay for our summer table. For some reason many of my vivid memories of childhood stem from that garden; I feel like I was forced to pick green beans for hours every day though looking back that may be a bit of an exaggeration. But when we moved about ten years ago, the gardening stopped. Our house now is built on what used to be an old junkyard and we just happened to be a bit dubious about planting our vegetables in a sea of broken windshield glass and car battery acid. I guess we put caution to the wind this year when we planted a boatload in our little garden plot and watched as it very quickly became a miniature jungle out there.

Our garden, in only the past few weeks, has absolutely flourished. The size of the plants dwarfs those of the neighbors. We harvest about 10 zucchini a night only to find 5 more the next day that seem to have popped up in the matter of a few hours. It’s kind of ridiculous. I think the real reason for this is the fact that my mom sprayed the dirt with Miraclegrow. So…technically our garden is on steroids, the products of performance enhancing drugs. Now we couldn’t enter anything into the biggest vegetable contest at the county fair if we wanted to (actually I’m not sure if that sort of contest even exists) for fear of an embarrassing disqualification.

The only problem with an overwhelmingly flourishing garden is a sudden lack of refrigerator space and mouths in the household to eat everything. It has come to the point where only about a third of the produce stays in our home and the rest is placed into the hands of anyone who will take it. Strangely, it’s been hard to give away the Swiss chard. No one seems to know what to do with it, which is a shame. Obviously all they have to do is go on this blog and look here, or here. Problem solved. I’ve also been getting creative with the zucchini. The other day I made a Mexican vegetable and tortilla “lasagna”. My agenda today includes some pickle production. And Monday I whipped up a batch of these super-healthy zucchini muffins.

Despite their uber-grungy-hippie façade, these are not your classic crumbly and dry health muffins. They are also not cupcakes in disguise. Sweetened with only a little sugar, moistened with canola oil rather than butter, and absolutely chockfull of tasty mix-ins and, of course, zucchini, these are wonderfully filling and even delightful. They are heaven when eaten warm with a schmear of peanut butter and cream cheese. They are also perfect for adaptation. You really can adjust the nut and dried fruit types to your preferences. Want sunflower seeds, pepitas, millet? Go for it. Hate coconut (shame on you)? Leave it out. You could definitely also throw in a handful of grated carrot for good measure, if you’re so inclined. So if you find yourself the receiver of someone’s superfluous zucchini crop, make these.

Zucchini (and lots of other stuff) muffins
adapted very slightly from Joanne Chang’s Flour cookbook
makes about 15 muffins

Ingredients
½ cup oats, ground into coarse powder with a food processor
½ cup hot water
1 medium zucchini
¼ cup dried cranberries
¼ cup golden raisins
¼ cup toasted chopped walnuts
¼ cup toasted chopped pecans
½ cup sweetened flaked coconut
½ apple, peeled, cored, and chopped into ¼ into cubes
2/3 cup light brown sugar
3 eggs
¾ cup canola oil
1 tsp. vanilla extract
1½ cups all-purpose flour
¾ cup whole old-fashioned oats
2 tsp. baking powder
½ tsp. salt
½ tsp. ground cinnamon
¼ tsp freshly grated nutmeg

Preheat the oven to 350 degrees. Put muffin paper liners in about 15 slots in some muffin tins.

In a medium bowl, stir together the ground oats with the hot water until it forms a paste. Set aside. Grate the zucchini into a strainer or colander.  Press on the zucchini to release some of the excess liquid. Measure out 1½ cups of the grated zucchini. Add the zucchini, cranberries, raisins, walnuts, pecans, coconut, and apple pieces to the wet oat mixture and stir to coat. Set aside.

Using a stand mixer with they whisk attachment, whip the three eggs and the brown sugar together on medium speed for 4 minutes until lighter in color and slightly frothy. Add the vanilla and then slowly pour in the canola oil in a steady drizzle. Remove the bowl from the mixer and set aside. Combine the flour, whole oats, baking powder, salt, cinnamon, and nutmeg in a medium bowl and stir to evenly combine. Pour the dry mixture into the mixing bowl with the egg and oil and quickly fold together until just mixed. Add in the zucchini mixture and gently fold into the rest of the batter.

Spoon the batter into the muffin tins. They will not rise very much so you can fill each almost to the top. Bake for 35 to 40 minute until just lightly browned on the top. These are best eaten within the first 24 hours they are made. For any extra, they keep for about 3 days at room temperature. They also freeze well, wrapped tightly in plastic or foil. Let them defrost in the refrigerator, at room temperature, or reheat in a 300-degree oven. I’ll admit, I actually heated them for 20 seconds in the microwave…you won’t want to wait for the oven to warm up, trust me.

Spanish Style Turkey Meatballs with Almond Sauce

I’ve been meaning to write about this one for a really long time. I just never really knew what to say about it exactly.

It’s a wonderful dish, full of savory Spanish style flavors and aromatic with the scent of lemon and fruity wine. It uses ground turkey too so I guess it’s a bit healthier without screaming “diet-food” in the least bit. And of course it’s convenient because the meatballs are baked rather than pan-fried so there is no need to worry about an overcrowded pan of half burnt meatballs falling apart every time you try to flip them over. The meatballs with the almond sauce are perfectly fine on their own but are even better with a nice wedge of crusty bread to mop up the juices and something fresh and green to dip in the remaining sauce.  I ate it for four days straight without getting tired of it and I think it’s a really great way to change up an ordinary weeknight meal.

So why had its image been sitting unused in my iPhoto gallery for the past two months? It just really had no story. It’s not passed down, not traditional to my heritage or upbringing or reminiscent of anything from my childhood. The recipe just sort of came out of nowhere and happened to turn out really quite well. It still has no story and I have yet to recreate it for my family. I’m the only one who has tasted this gem, which is why I’m now suddenly itching to release this dish to the world instead of hoarding it to myself until I think of what to say about it. Enjoy.

Spanish Style Turkey Meatballs with Almond Sauce
serves 4 meatballs are original and sauce is adapted from this

This would be a perfect thing to bring to a potluck/tapas sort of party if you make the meatballs smaller and serve with toothpicks in a pool of the sauce. It would be nice on cooler pre-summer nights accompanied by a glass of the leftover wine used to make the dish. Of course you can certainly try it with other sides like sautéed greens or asparagus rather than the French beans if you’re going for a more seasonal thing too.

Ingredients
2 Tbs. olive oil
½ of an onion, diced
1 cup cremini mushrooms, diced
1 clove garlic, minced
1/3 cup chopped roasted red peppers either jarred or homemade (instructions here)
2 Tbs. minced parsley
1 tsp. dried oregano
1 tsp. paprika
2 slices white bread, crusts removed
1¼ cups chicken or vegetable stock
1 cup plus 2 Tbs. Pinot Grigio or another fruity, dry white wine
1 lb ground turkey
zest of 1 lemon
2 tsp. sugar
¼ cup blanched almonds
salt and pepper to taste
a loaf of crusty white bread and greens to serve (optional)

For the meatballs, preheat the oven to 350 degrees. Heat 1 tablespoon of the oil in a skillet over medium heat. Add the onion, mushrooms, garlic and salt and pepper to taste and sauté for about 5-7 minutes until tender. Transfer to a large bowl to cool slightly and set aside. Tear up one piece of the bread into a bowl and pour over ¼ cup of the stock and 2 tablespoons of the wine and mash with a fork until the bread is completely saturated. Set aside for 5 minutes.  Add the roasted red pepper, parsley, oregano, paprika, and soaked bread with liquid to the onion and mushroom mixture and stir to combine. Add the turkey to the mixture and mix until just combined evenly. Diving into 16 balls space them evenly on a parchment lined baking sheet. Bake for 25-30 minutes until golden and cooked through.

While the meatballs bake, make the almond sauce. In a large skillet, bring the remaining stock and remaining wine to a boil. Add the lemon zest and sugar and reduce to a simmer. Meanwhile, in another skillet, heat the other tablespoon of oil over medium high. Tear up the other piece of bread into the skillet along with the almonds and fry until the bread and almonds are golden. Set aside to cool slightly and then whiz them in a food processer until you have a fine powder. Add the almond and bread powder to the simmering stock and stir. Simmer over low heat, stirring occasionally, for about 10 minutes adding additional liquid as needed.

Serve the meatballs with the sauce with a wedge of a rustic country loaf and greens of your choice.

Mocha Porter Ice Cream

Oh gosh. It’s that time of year. It’s ice cream season again. Not that I stopped eating ice cream all winter or anything; now I’ll just eat 2-3 times as much. I blame Jeni and David for the overindulgence. If their creations weren’t blatantly staring me in the face from their place on the bookshelf all day, this blog wouldn’t always have an almost monthly spiel on how much I love the stuff. This may be the sixth ice cream post I’ve done in 10 months of this blog’s existence but trust me, there will be more. Deal with it.

I’ve become a bit of a beer fan in the last few months. My college town was really into the whole craft beer industry so it was hard to go to any restaurant or bar and resist trying some of the crazy beers they’d have for tap takeovers and steal-a-pints. I never really used to like alcohol (or drink it for that matter) until I turned 21. Then I began to pair wines and beers with food at restaurants and saw I was missing out on a really interesting, scientific, and delicious art form. And, as with most things, I seem to be drawn to the sweeter brews: porters, stouts, wheats. Back on St. Patrick’s Day I saw so much hype about Guinness floats (Guinness poured over vanilla ice cream). I tried it. It was amazing. From that moment on I scoured the Internet in search of some kind of beer ice cream and of course it all came back to Jeni and her wild concoctions. In her book she has a recipe for a Kona stout ice cream so I took that, a bottle of Tommyknocker Cocoa Porter, and made what I think is my favorite among the ice creams I’ve tried since the dawn ofmy ice cream machine.

Let me introduce you to Mocha Porter Ice Cream.

This ice cream takes all of the good aspects of a mocha frappuccino, the strong and slightly bitter coffee flavor complicated slightly by chocolate undertones, adds beer, and turns what is usually is watery icy beverage into decadently smooth and rich ice cream. Despite its high water content from the beer, the ice cream is surprising creamy yet there is just enough slight iciness that is somehow feels cooler and more refreshing on the tongue. The alcohol softens it up so it can be scooped straight from the freezer, which is especially nice when I’m stealing small spoonfuls about every thirty minutes. The beer I used was a porter flavored with cocoa and honey so the ice cream gets slight chocolaty and floral notes along with the beer’s natural strong maltiness. For the coffee, the main flavor component, I used Caribou Medium Blend coffee, which has chocolate flavors, to complement everything else going on. I have a feeling that this batch is not going to stick around for too long. Between my mom and I and the gorgeous weather we are having, I’m going to give it about a 3-day life span. Time to get buzzed!

Mocha Porter Ice Cream
Slightly adapted from Jeni’s Splendid Ice Creams at Home
makes a little more than 1 quart

Ingredients
2 cups whole milk
1½ Tbs cornstarch
3 Tbs softened cream cheese
1/8 tsp. fine sea salt
1¼ cups heavy cream
2/3 cup sugar
2 Tbs light corn sypup
2½ Tbs coarse ground coffee, medium or dark roast (I used Caribou Medium Blend)
½ dark porter or stout beer (I used Tommyknocker Cocoa Porter)
1 tsp vanilla extract

To prep, mix two tablespoons of the milk with the cornstarch until smooth. Set aside. Whisk the cream cheese with the salt in a large heatproof bowl and set aside. Prepare an ice bath in a large bowl.

Combine the rest of the milk, the cream, the sugar, and cornstarch in a large saucepan. Bring to a boil and let boil for 4 minutes. Remove from heat and stir in the coffee grounds. Let the mixture steep for 5 minutes. Pour the mixture through a cheesecloth line sieve into another bowl to remove the coffee grounds. Squeeze the cheesecloth to extract as much flavor as possible. Return the liquid to the saucepan and bring back to a boil. Once boiling, whisk in the cornstarch slurry and cook for 1 more minute. Remove from the heat.

Whisk the milk into the cream cheese mixture until well combined and smooth. Stir in the porter and the vanilla. Transfer mixture to a gallon plastic bag and submerge in the ice bath for about 30 minutes or until the ice cream mixture is well chilled. Pour the mixture into the ice cream maker and freeze according to manufacturer’s instructions. Pack into a storage container and freeze until firm, about 4 hours, before eating.