Banana Bread Crepe Cake (and 100,000 views!)

Holy Moly! Today this little blog here reached 100,000 views! I know that in the big grand scheme of things there are many blogs that probably get this amount of traffic in a day but this is not one of those blogs so for me this is a pretty big deal. Also, in 8 days Honeycomb will be 3 years old. Back when I had a single solitary post, I was still at the beginning stages of really getting into cooking and knew next to nothing about how to photograph food. This was nothing more than a summer project that I was certain would diminish once school started back up again. But here we still are, 80 posts later and, did I mention, 100,000 views later!

It may be nothing more than my little pet project. It doesn’t consume me and I don’t really ever want it to. It’s meant to be just for fun. But still it has helped me grow immensely as a cook and a photographer and it means so much to me whenever I find out that a friend of family member read a post or cooked a recipe from it. So thanks for helping Honeycomb get this far! I think you deserve a cake!

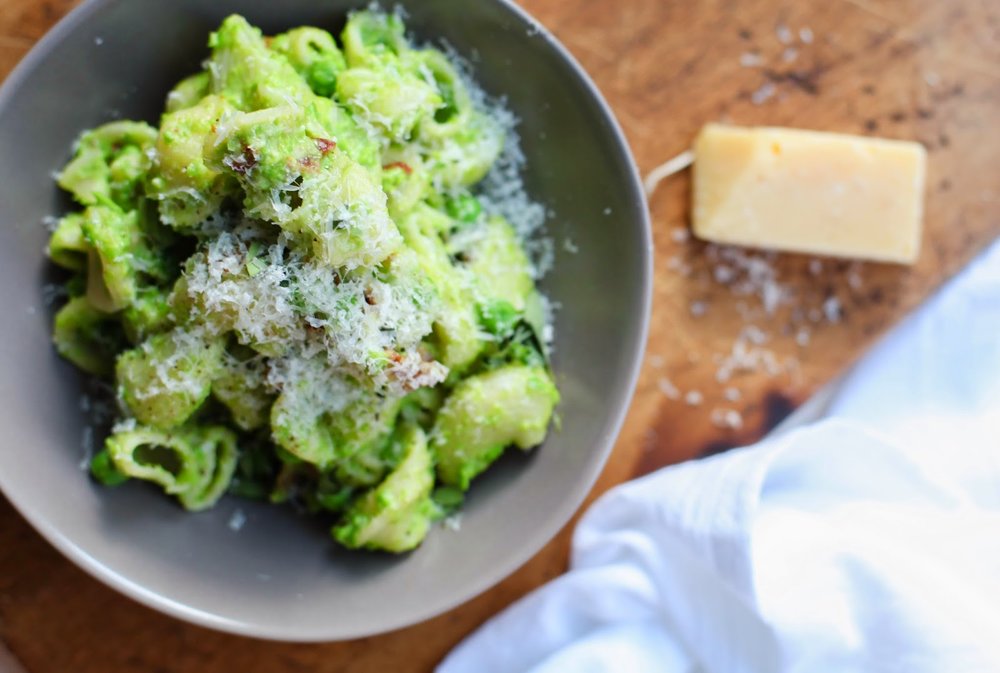
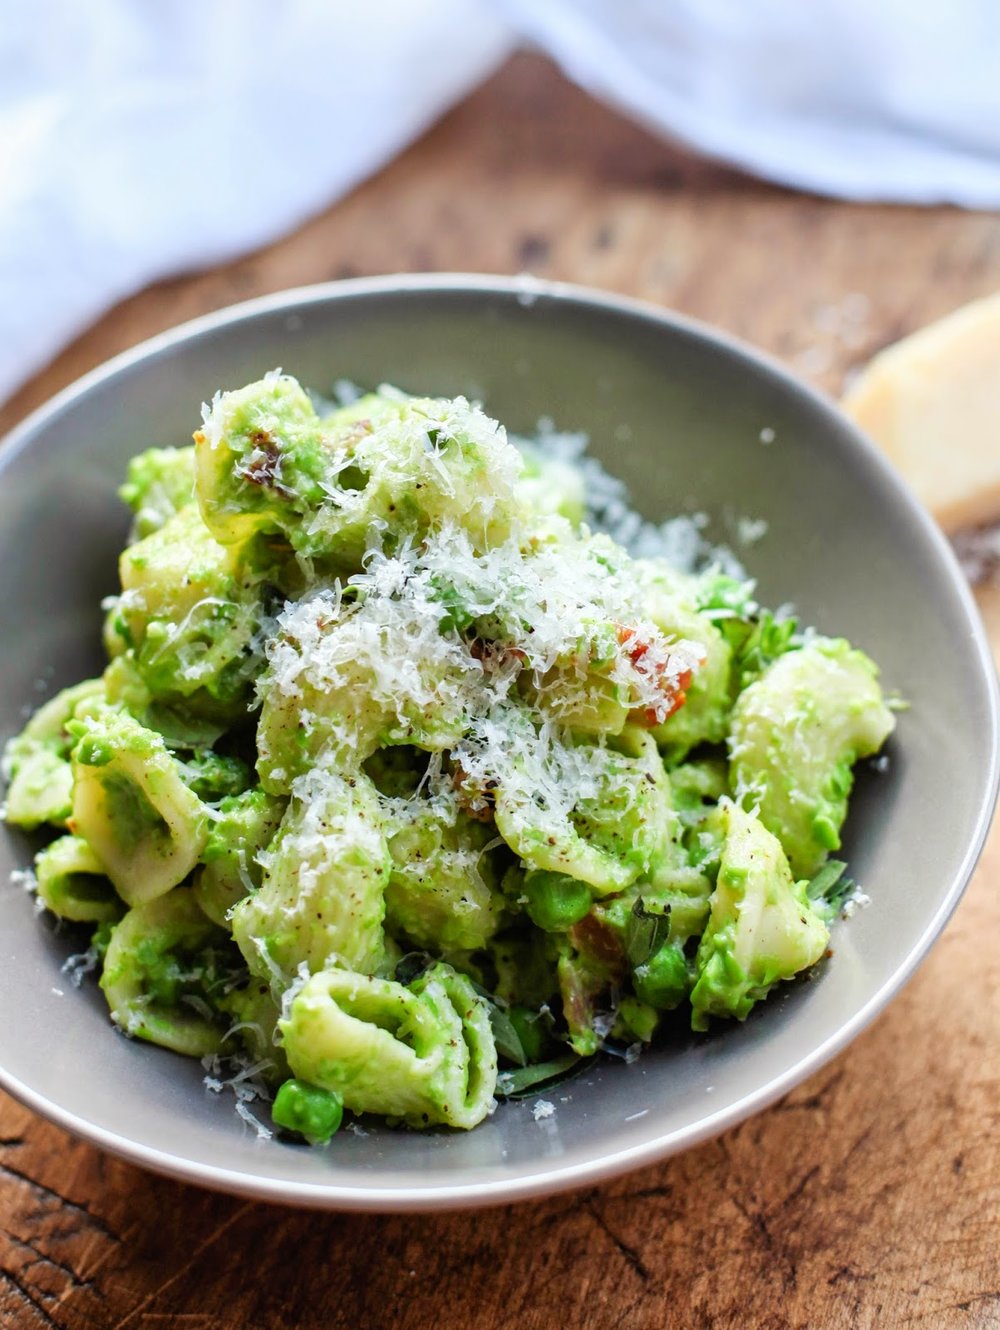
This here is a banana bread crepe cake. The recipe is from Deb Perelman’s Smitten Kitchen, the blog that really spurred my initial interest in blogging and the one that I go to for inspiration almost every single day. So, it really makes sense that it’s making an appearance on this monumental day.  But back to the cake. Crepe cakes are kind of my new favorite thing. Make a bunch of crepes, layer them with a nice sweet filling of some sort and you’ve got a cake. No oven needs to be turned on, there’s no worry about perfectly applied icing.  They are impressive in appearance but dead simple. Trust me, make one and watch how impressed everyone is when you slice into the multilayered goodness.

I originally made this cake for a Lumberjack themed housewarming party my roommates and I had. The original thought was that you can’t have a lumberjack party without flapjacks but them I realized that the last thing I wanted to do was flip pancakes while trying to host a party. Solution: Pancake cake! But after making it, falling in love with it, and watching it disappear within 30 minutes, I realized that this is a cake for the ages, not just for lumberjack themed parties. I made it again for my mom on Mother’s Day and she enjoyed it so much she made it for her mom a few weeks later. What’s nice is you can prepare it a day in advance too. It’s actually better this way because the overnight rest in the fridge lets the crepes and the filling meld into one cohesive, creamy cake and produces clean cuts that show off all the layers.

It is light on sweetness with a subtle banana flavor and a pleasant tang from the yogurt cream cheese filling.  I can see it being a great addition to a spring or summer brunch, topped with fresh fruit and maple syrup or for a festive 4th of July picnic, and, of course, for parties celebrating our favorite burly, wood-chopping fellows. But, it’s also perfect for a celebration of the simple things, like 100,000 views and 3 years strong. Thanks and here’s to 100,000 more!

Banana Bread Crepe Cake
Adapted very slightly from Smitten Kitchen

Ingredients
For the Crepes
4 Tbs Butter, melted then cooled slightly
1 large ripe banana
1 cup milk
¾ cup all-purpose flour
4 eggs
2 Tbs. light brown sugar
½ tsp. vanilla extract
¼ tsp. salt
½ tsp. cinnamon
¼ tsp, freshly grated nutmeg

For the Filling
8 oz. cream cheese, softened
1½ cups plain greek yogurt, preferably 2% or full-fat
1/3 cup granulated sugar
½ tsp. vanilla extract
Maple syrup, for serving

Begin by making the crepes. Place the banana in a blender and pulse until smooth. Add the butter and blend again. Add the rest of the crepe ingredients and blend until frothy and completely smooth, scraping the sides if needed to combine any stray flour clumps. Transfer to a bowl and refrigerate for at least and hour, preferably longer. Can stay refrigerated for up to 2 days.

While the batter rests, make the filling. Whip the cream cheese using a stand mixer or handheld mixer until fluffy and smooth. Add in the yogurt, 1/3 at a time, until well incorporated. Add the sugar and vanilla and continue to whip for another minute. Transfer to a bowl and refrigerate until ready to use.

Make your crepes. Heat a medium-sized skilled over medium heat. Melt about 2 Tbs. of butter in a small dish. Using a pastry brush, lightly coat the skillet with the butter before cooking each crepe. Pour ¼ cup of the batter into the pan and swirl the pan around until it is evenly coated with the batter. Cook until the bottom is golden, the top has small bubbles and begins to look dry, and the crepe easily moves around the pan if you shake it slightly, about 2 minutes. Flip (see original recipe post for Deb’s flipping method – it works great) the crepe and cook on the other side for about 20 seconds. Slide the crepe onto a plate and continue making them until the batter runs out. Note that you can stack the crepes on top of one another on the plate and they, for some reason, will never stick to each other. It’s magic.

Once the crepes are cool, place one on the bottom of a cake stand or a large, flat plate. Use an offset spatula or a knife to spread ¼ cup of the filling evenly over the crepe. Top with another crepe. Repeat this process, ending with the last layer of filling on the top of the cake. Refrigerate until ready to serve and drizzle a healthy amount of maple syrup overtop right before serving. Top with fruit, if desired. Will keep for 3-4 days.

Carrot Bread with Cranberries and Hazelnuts

This past Saturday I finally achieved a goal that I’ve been carrying around with me for quite some time; I ran my very first half-marathon! I was a runner in high school but I sort of fell out of the habit during the stress and busyness of college. I would try to pick it back up at times but always lost the motivation. But, this past March I suddenly had a stroke of determination and signed up for a half marathon on a whim with a couple of friends.

So, Saturday morning, 3000 runners lined up at Doukénie Winery at 7:00 in the morning for the Virginia Wine Country Half-Marathon and after 2 hours and 12 minutes of experiencing the highs of running endorphins and the extreme pains of 10 simultaneous toe blisters and grinding knee joints, and then of course the final 0.1 mile sprint to the finish line, it was all over. The finish line doubled as the entrance to the winery where a huge wine tasting festival took place and later, my mom made an enormous brunch and I simultaneously shoveled pancakes, bananas, eggs, and sausage gravy into my mouth like a ravenous beast, followed by second breakfast and two full dinners; Clearly this is one of the perks that totally makes up for the pain of the run itself.

The week prior to the big race was the chance to load up of as many carbs as possible for energy stores and I still felt that need for carbs afterwards for refueling. That next day I remembered I had about a third of a bottle of carrot juice in the fridge and decided to use it to make a really unique, but one of my favorite loaves of bread.

The entire loaf is made of nothing but flour, yeast, salt, and carrot juice instead of water. It gives the crust this really nice rust color, a decent about of moisture, and a slightly sweeter flavor. I added dried cranberries and toasted hazelnuts for some texture and crunch and buckwheat flour to balance out the sweetness. It uses Jim Lahey’s no-knead method too so it’s a cinch to prepare and it makes for excellent toast with peanut butter, a great side to some soup (pictured is chicken orzo avgolemono), and, my favorite, a divine turkey and cheddar sandwich. Though I didn’t have the bread during my pre-race carb loading stage, I’ll have to keep it in mind for the next one…whenever that may be.

Carrot Bread
Adapted from Jim Lahey’s My Bread
Makes 1 round loaf

Ingredients
350 grams bread flour
50 grams buckwheat flour
¼ tsp instant yeast
1½ cups plain carrot juice
¾ cup dried cranberries
¾ cup hazelnut, lightly toasted and coarsely chopped
1 Tbs. sesame seeds

In a medium bowl, combine the flours, salt, and yeast. Pour in the carrot juice and use a wooden spoon or your hands to combine. Add the cranberries and hazelnuts and mix until evenly combined. Cover the bowl with plastic wrap and let it sit at room temperature for 12-18 hours.

Once ready, dust your counter with flour and scrape the dough onto the counter. Knead lightly and shape it into a round. Line a clean bowl with a clean dishtowel and dust heavily with flour. Sprinkle the sesame seeds into the cloth. Place the dough, seam side down, into the bowl and cover with the overhanging towel. Let rise for 1-2 hours, or until about doubled in size.

30 minutes before the dough is ready, preheat the oven to 450 degrees, place the oven rack in the lower third, and set a Dutch oven on the rack to preheat. Once well heated, remove the Dutch oven, take off the lid, and invert the dough into the center. Place the lid back on, and place the entire pot back into the oven for 25 minutes. Remove the lid and cook for another 12-15 minutes. Be careful that the bottom does not burn. Remove from the oven and transfer the loaf to a cooling rack to cool completely before slicing.

Goat Cheese: A Love Story

 My love affair with goat cheese began at an early age, much earlier than people should really be developing tastes for things that are gamey, funky, and just plain goaty…but it still happened. If it could be considered a condiment, it might be my second favorite, behind maple syrup, and I am partial to eating it on toast with cherry jam for breakfast probably more often than I really ought to.

When I was home for Easter my mom and I took a short drive to Georges Mill Cheese, a start-up goat cheese business in my hometown, that has quickly been making a name for itself. We picked up some bloomy rind goat cheese and some chevre and while we were there were able to see the young goats. They ranged in age from about 2 weeks to 24 hours old. The newborns took a while to get to us because they were too scared to come down the hill to where we were standing and when they finally did I could see just how wobbly they still were on their little legs.

And the cheese was as amazing as the baby goats were adorable. The chevre was really mild and buttery and the aged goat cheese had a good tangy funk to it, in the best way possible. I polished it off in about 2 days and was left craving more and more goat cheese. I went for yet another recipe from River Cottage Veg, this time a Kale Farrotto (risotto made with farro) with soft-rind goat cheese to fulfill that craving. I’ve really come to like these risottos made out of grains instead of rice. The grains give a nuttier flavor and hold their shape much better so it has a little more chew rather than turning into mush. I’ve also tried this grain method before with barley with good results. This risotto, however, gets a lot of richness from leeks sautéed in loads of butter and a good dose of pecorino cheese, which lends a creaminess that grain risottos have and harder time achieving. Rounds of the soft-rind goat cheese sit overtop and turn slightly melty from the heat. All-in-all it’s rich, warming, tangy and creamy, perfect for these rainy, cool spring days.

Kale “Farrotto” with Goat Cheese
Serves 4
Adapted from Hugh Fearnley Whittingstall’s River Cottage Veg

If you can’t find pearled farro, pearled spelt or barley would be suitable substitutes. This recipe is great for using up some new spring greens too; Swiss chard would be a great alternative for the kale.

Ingredients
1 quart vegetable stock
3½ Tbs butter
2 Tbs olive oil
2 large shallots, finely chopped
1 clove garlic, minced
a few sprigs of thyme, leaves chopped
2 medium leeks, trimmed to the bottom lighter parts only
4 oz. kale, torn in to medium-sized pieces
10 oz. pearled farro
½ cup dry white wine
2 oz. pecorino romano, grated, plus more for serving
a soft-rind goat cheese round (I used one with a vegetable ash coating)
salt and pepper, to taste

Heat the stock over medium until it comes to a low simmer. Set aside, covered, to keep warm. Cut your leeks in half and cut each half on a diagonal into ½ inch wide strips. Rinse well under cold water and let drain in a colander. Heat half the butter and 1 Tbs of the oil in a small saucepan over medium-low heat. Add the leeks and a bit of salt and gently cook, stirring occasionally, until tender with just a bit of bite left, 5-7 minutes.

Transfer to a bowl and set aside. In the same pan, add a little bit of water and the kale. Cook over medium, covered, until the kale is wilted, 3 minutes. Drain and also set aside.

In a large saucepan, heat the remaining butter and oil over medium. Add the shallots, garlic, thyme, and a good pinch of salt and cook gently for about 10 minutes until soft and very lightly browned. Stir in the farro and cook, stirring for another minute or two. Add the wine and cook until absorbed.

Add the stock, a quarter at a time, and stir often, adding more stock as it gets absorbed completely.  This should take about 25 minutes. Once the stock is used up, taste the farro. If it’s still a bit too chewy for you add about another ½ cup to a cup of water and keep stirring until absorbed. Stir in the leeks and kale and cook for a few more minutes. Add in the grated pecorino and some cracked black pepper and mix throughout. Taste and add more salt if needed.

To serve, dollop the risotto into a bowl. Top with a drizzle of olive oil, more grated cheese, a few rounds of your soft-rind goat cheese, and more salt and pepper, if desired.

Pasta with Creamy Pea Sauce

Over the past few weeks I’ve really been hit hard with an intense feeling of being blissfully busy. Yes, this is a good thing. Living a half-mile from my work has opened up so may doors, freeing up at least three hours of daytime that I used to spend sitting behind the wheel. I have been cramming loads of stuff into every nook of free time that I have acquired. Again, good thing. Things like being on a recreational softball team, cake commissions and simply going to a party or a post-work happy hour are at last doable. I’m living large over here people!

Most notable, though, is that I’ve been running quite a bit. I decided on a whim to sign up for a half-marathon and only give myself 2 months to train so I’ve had to adapt to a pretty intense running routine that I haven’t had since high school. It’s been hard to get back into it but I’m quickly regaining that sort of life-high that comes with regular running. There’s just something about spending the first hour of the day outside that sets everything off right. I share the morning with a lone fox perusing the remains of someone’s overgrown garden, herds of suburban deer, and corporate gentlemen making their morning bike-commute. I head out with a hazy, halfway sun and return with emerging light rays. It’s pretty great.

So what does someone with a plethora of busyness and ravenous post-run food cravings eat. Pasta, of course. More specifically, pasta drenched in a creamy, garlic-butter, green pea sauce. I’ve made a huge load if it twice in the past month and it might just become a problem because I’m still craving it. The recipe is from River Cottage Veg by Hugh Fearnley-Whittingstall. Coming from this book, then, it is technically supposed to be a vegetarian recipe, but honestly I add bacon to it and it’s delicious so I don’t care what anyone thinks. It’s really quite simple and relatively cheap and you can make a ton of it, divvy it up between pyrex containers, and eat it for lunch all week long. Basically all it takes is whizzing up some warm peas in a food processor with garlic butter, mascarpone, and parm and mixing it with some hot pasta, crispy bacon and a few more whole peas. That’s about all there is too it. One could say it’s easy peasy…or one could not. I’m leaving now.

Pasta with Creamy Pea Sauce
Adapted from Hugh Fearnley-Whittingstall’s River Cottage Veg
Serves 3-4

Note: I really like using orecchiette or conchiglie pasta for this because the cup shapes make a great place for peas to get trapped. It’s like a little surprise when you bite down and get pleasant pop of a pea in your pasta.

Ingredients
1 lb. frozen peas
12 oz small pasta
3 Tbs. butter
1 garlic clove, finely chopped
1/3 cup mascarpone cheese
1 oz. Parmesan, grated, plus more for serving
6 strips cooked bacon
salt and pepper

Begin by frying your bacon in a large skillet. Once cooked, crumble it into large-ish pieces and set aside. Bring a large pot of salted water to a boil for your pasta. While that comes to a boil, wipe out the frying pan and pour in your frozen peas. Cover with water and bring to a boil as well. Let simmer for a few minutes. Using a measuring cup, reserve ½ cup of the pea cooking water and drain the peas. Set aside.

Add your pasta to the pot of boiling water and cook according to package instructions. While the pasta cooks, use the same skillet and heat the butter over low heat. Once melted, add the garlic and cook gently for 2-3 minutes until soft, but not colored.

Combine ¾ of the warm peas, the pea cooking water, garlic butter, mascarpone, and parmesan cheese in a food processor and blend until smooth. Season to taste with salt and pepper. Once the pasta is done cooking, drain and combine immediately with the pea sauce in a large bowl. Combine with the remaining whole peas and the bacon. Serve with more parmesan, cracked black pepper, some red pepper flakes, and a drizzle of olive oil.

Moroccan Carrot Salad with Sesame Lamb Meatballs and Couscous

Things have been pretty low-key around here lately. After my short escape to 80-degree weather and sunshine, the return to this seemingly non-ending winter has re-dampened my spirits a little bit. What little tan I obtained lasted all of about 3 days and already I’ve slipped back into the normal daily routine following that post-vacation high.

I’ve been finding ways to keep my mind and my hands busy though, other than using them to repeatedly place dark chocolate Cadbury mini-eggs in my mouth.  I’m finally starting to make use of that gym membership I signed up for over a month ago and last weekend my roommates and I hosted a small brunch gathering complete with sourdough waffles, sweet potato frittata, plenty of bacon, mimosas, and a day long marathon of Survivor reruns. I also saw The Grand Budapest Hotel and was more than satisfied with Wes Anderson’s newest bizarre yet brilliant creation. And throughout it all I’ve been eating lots of Moroccan food.

When it comes to comforting food, I rank those with loads of warm spices among the likes of all things cheesy, brothy, and carby.  For me, the flavors of Morocco, Greece, and India are some of the most inviting and throughout the last few years I have been striving to expand my repertoire of spice knowledge and ethnic cooking, mainly because I just love it so much. This past week I combined a few Moroccan inspired recipes and came up with these awesome carrot salad and lamb meatball bowls. Carrots are cooked until soft, mashed, and doused with a lemony cumin dressing. They’re piled over a mound of buttered couscous and topped with olives, scallions, feta, and preserved lemon. Finally, little sesame lamb meatballs are placed alongside. It was as excellent as leftovers as it was the night I made it and was the perfect companion to a glass of wine on a snowy evening.

Moroccan Carrot Salad with Lamb Meatballs and Couscous
Salad adapted from David Tanis’ One Good Dish
Meatballs adapted from Deb Perelman’s The Smitten Kitchen Cookbook
Serves 4

Please note that, although optional, the preserved lemon really makes this dish. It’s a little hard to find and a bit unkind to the wallet but I definitely think it’s worth the effort to find some.

For The Salad
2 lbs. Carrots, peeled
½ tsp. ground cumin
½ tsp. ground coriander
3 Tbs. lemon juice
½ tsp. finely chopped garlic
1 tsp. grated ginger
pinch of cayenne
salt and pepper
¼ cup olive oil
4 oz. feta cheese
1 small preserved lemon – rinse, remove the pulp, and finely dice the rind
2 scallions, chopped
a large handful of kalamata olives chopped

For The Meatballs
1 lb. ground lamb
2/3 cup fresh breadcrumbs
¼ cup water
1 tsp. salt
1 large egg
2 cloves of garlic, minced
½ tsp. ground cumin
½ tsp. ground coriander
½ tsp. smoked paprika
a large pinch of red pepper flakes
2 Tbs. sesame seeds, toasted

To Serve
1 cup couscous, cooked according to package instructions
1 Tbs. butter

Place the carrots in a large pot of salted water. Bring to a boil, reduce to simmer and cook until tender, about 15 minutes. Drain, and let cool for about 10 minutes. To make the dressing, combine the cumin, coriander, lemon juice, garlic, ginger, cayenne, and salt & pepper in a small dish. Whisk in the olive oil. Use a potato masher or a fork to roughly mash the carrots. Pour over the dressing and stir to combine. Taste and add salt if needed. Sprinkle over the feta, preserved lemon, scallions, and olives.

While the carrots cook, start making the meatballs. Preheat the oven to 400 degrees and line a large sheet pan with parchment paper. Combine all of the meatball ingredients in a large bowl and use a fork/your hands to mix everything together until evenly combined. Do not overmix. Divide the mixture into quarters and make four meatballs out of each quarter for a total of 16 meatballs. Place them on the baking sheet and bake in the oven for about 13-15 minutes until the internal temp. is 160-165 degrees.

Make your couscous and once cooked, add in the butter and toss until melted and mixed. Divide the couscous amongst 4 bowls, followed by the carrot salad. Finish each bowl with 4 meatballs per person.