Honeycomb Ice Cream for my 100th Post!

I am very excited to say that this is officially my 100th post on Honeycomb. Just a month shy of when it all started 4 years ago, I can’t believe that number 100 is already here. I also can’t believe that, when averaged out, that means I’ve done one post about every 2 weeks. I thought I was way lazier than that so that’s just crazy.

It’s a bit of a strange feeling to get to this point though. I will admit that in the 4 years, there are have been many times where I simply thought about giving it all up. When I started, the food blog thing was certainly an up-and-coming fad but still not too widespread. I had these grandiose ideas that one day some fancy pants food magazine would give it a shout-out and the popularity would grow rampant. But after a long time of that not happening and food blogs becoming something that seemingly everyone and their mother had, I started to lose a bit of steam. What was the point if no one was reading it?

But every time I would get like that, something would pull me back. Maybe someone would tell me that they shared it with a friend or that they cooked one of the recipes and it turned out great. Something little but more than enough to make it all seem worth it again. The blog has changed a lot from post 1 to post 100. It started with a bit of a hippie health blog vibe, moving into angsty posts from my days spent trying to find a job, and shifting into what it is now which focuses heavily on the photography and seasonal eating with travel dining guides thrown in whenever I take a trip. I’m quite happy with where it is today and seeing how it has developed and I continue to be so glad for those moments that keep it all going!

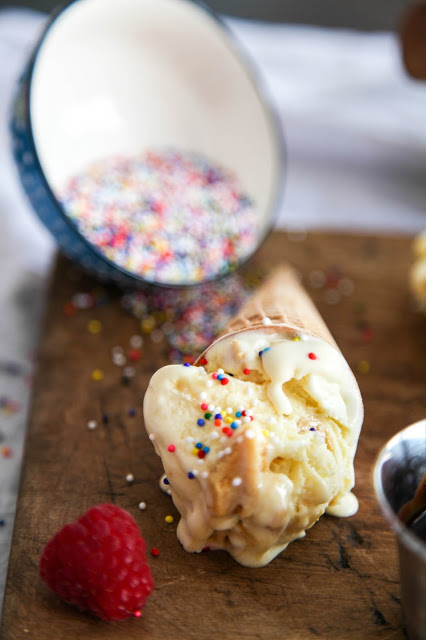
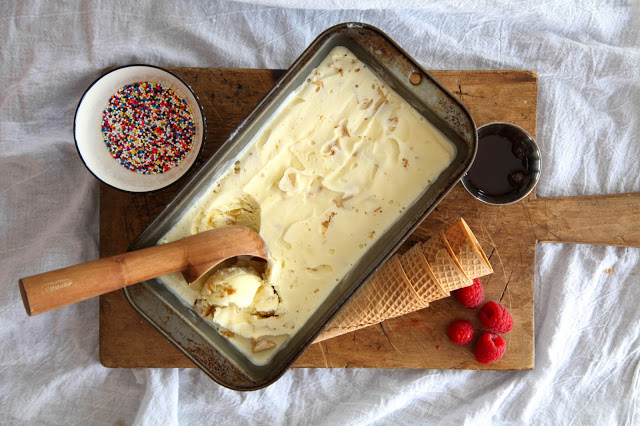
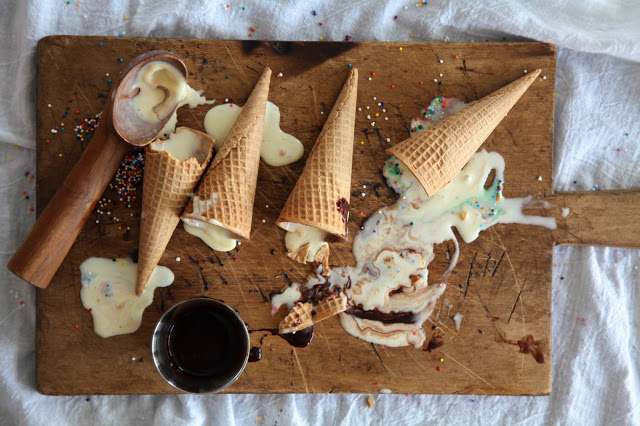
So, to celebrate, what could be more appropriate than some honeycomb ice cream! This is probably my simplest ice cream yet but extremely satisfying. The ice cream base is straight up vanilla custard. It’s crazy sweet but unapologetically so. It gets a fantastic crunch and extra layer of flavor from handfuls of crushed-up honeycomb candy throughout. The best part is, the candy starts to melt a little in the freezer too, giving the ice cream a burnt sugar swirl. To balance out the sweetness, I highly recommend enjoying with some dark chocolate sauce and a sprinkle of some flaky sea salt (believe me, it’s fantastic) or some nice tart raspberries. And, since were celebrating here, rainbow sprinkles. Obviously.

Honeycomb Ice Cream
Makes about a quart
Recipe from Yossy Arefi via Food 52

Ingredients

For the Honeycomb
½ cup granulated sugar
¼ cup golden syrup or dark corn syrup
1½ tsp. baking soda
pinch of salt

For the Ice Cream
2 cups heavy cream
1 cup whole milk
1 cup sugar
4 egg yolks
1½ tsp. vanilla extract
pinch of salt

Begin by making the honeycomb candy. Line a baking sheet with parchment paper. In a medium saucepan, combine the sugar and syrup and stir until it becomes a paste. Place it over a medium heat. Let it cook and bubble away until the sugar is melted and the mixture is a dark maple color. Do not stir with a spatula but you can slowly tilt and swirl the pot occasionally. This should take about 5 minutes.

Once ready, whisk in the baking soda and salt. It should bubble and foam. Quickly pour the mixture onto the sheet pan. It doesn’t matter if it’s smooth, just get it all onto the sheet as fast as possible. Let cool completely before touching again. Once cool, break up into small dime-size pieces. Store at room temp in an air-tight container until ready.

To make the ice cream, combine the cream, milk, and sugar in a medium saucepan. In a separate bowl, whisk the egg yolks together. Place the saucepan over medium heat and stir until the sugar is dissolved. When the mixture starts to get small bubbles around the outside edge of the pot, remove from the heat. Slowly pour a little bit at a time into the bowl of egg yolks, while whisking. Once you’ve added about a half-cup, pour the warmed egg yolks back into the pan with the milk mixture.

Return the saucepan to the stove over medium heat. Continue cooking and stirring constantly until the mixture is thickened and coats the back of a spoon. This will take about 4-5 minutes. Remove from the heat and stir in the vanilla and salt. Pour into a container and let sit in the fridge overnight.

Then next day, churn the ice cream according to the machine’s instructions. Just before the ice cream is done churning, add in about ¾ cup to 1 cup of the honeycomb candy. Transfer the ice cream to a freezer-safe container and let freeze for at least 3 hours before eating. As mentioned above, it’s agreat with chocolate sauce, sea salt, and berries.

Israeli Couscous with Ricotta and Mint

In the past year or so I have really been making progress in visiting new states and big U.S cities, starting with Arizona, then to NYC, over to San Francisco, down to Charleston, South Carolina, and finally, this past weekend to Nashville. Granted I spent all of about 2 hours in Nashville before heading an hour south for the wedding of my beautiful friend Kelly, but had a blast celebrating in a go-big or go-home southern style. I ate too much, I drank too much, I regret nothing.

I left my camera at home for this trip, sadly passing up the chance to document some really awesome eats (lot of biscuits included!) but did manage to hit up a few lunch and coffee spots that I would highly recommend.** So, after returning home yesterday, nursing a wicked hangover and eating a salad for dinner as if cancel out a weekend full of butter-laden and whiskey-induced damage, I decided a little casual cooking and something to attempt to wean me back into a normal food routine couldn’t hurt.

This recipe for Israeli couscous with ricotta and mint is a nice way to bring some comfort and freshness to what is now straight-up summer weather. After par-cooking some Israeli couscous, the rest comes together in one skillet. Bacon and onion get to know each other in the pan before joining forces with a hefty dose of white wine, chicken broth, peas, the pasta and fresh mint. What remains is something borderline soup-ish, a brothy pasta dish that gets several dollops of ricotta and a good drizzle of olive oil at the end. Coming together quite quickly, it makes for a great after work, recovery day dish.

**For a great cup of coffee check out the super-hipster Barista Parlor and then head to The Pharmacy Burger just down the road for burgers, beers, and housemade German sausages. And, if you have a car, I highly recommend a tour at the Jack Daniel’s distillery in Lynchburg, about an hour south of the city.

Israeli Couscous with Ricotta and Mint
Serves 4
Recipe from Bon Appetit

Ingredients
1¼ cups dry Israeli Couscous
2 Tbs olive oil, plus more for serving
4 slices of bacon, chopped
1 onion, chopped
1 cup dry white wine (I used a pinot grigio)
2½ cups low-sodium chicken broth
1 cup frozen peas
2 Tbs. finely chopped fresh mint
Whole milk ricotta, for serving
Salt and pepper

Cook the Israeli couscous in a large pot of salted boiling water for 6 minutes. Reserve 1 cup of the cooking water and drain the pasta. Set aside.

In a large skillet, heat the oil over medium. Add the bacon and cook, stirring often until it starts to brown, about 5 minutes. Add the onion and continue to cook for another 5 minutes. The bacon should be crispy at this point. Add the wine, bring the mixture to a simmer and cook for another 5 minutes. Add in the broth and the pasta and return to a simmer. Cook until thickened and the pasta is al dente, about 5-8 minutes more. Give it a taste and season with salt and pepper, as desired. Add the peas and mint and cook for another 2 minutes, adding some of the reserved pasta water if it gets too thick.

Serve in a bowl with many dollops of ricotta, torn fresh mint leaves, olive oil, cracked black pepper, and a sprinkling of flaky sea salt.

Liège Waffles

In the realm of sweet breakfast-y things that are generally paired with butter and, my favorite condiment, maple syrup, waffles are without a doubt my numero uno. Over the years it evolved from the Eggos and Aunt Jemima of my childhood to the classic Belgian style with real syrup, and then became more experimental. I had much success with the previously documented oat and orange waffles with whipped cottage cheese and pear-cherry compote and I have dipped my toe in the realm of the yeast-raised variety. And yes, I am talking about the ever-famous Marion Cunningham ones. But I must say, despite a whole lot of waffle lovin’ in my life, the ones that changed everything are the Liège waffles.

I first had them in what now seems like a full state of waffle naiveté from a food cart in London. On that chilly fall day, waffle-in-hand and walking through Hyde Park, I took a bite, expecting something along the lines of the crispy pancake-esque waffles I was used to but got so much more. Made from a slow rising yeast dough, enriched with lots of butter and eggs (think brioche) and studded with handfuls of Belgian pearl sugar*, the Liège waffle, once cooked in the waffle iron, becomes a whole new beast.

The inside stays very tender and light but at the same time has a nice bit of chew and stretch to it, like a croissant. But the magic happens on the outside. The pieces of pearl sugar completely melt with the heat of the iron coating every part of the waffle exterior with molten caramel. Once cooked, removed and let to cool slightly, this sugar hardens into a paper thin layer of crackly sugar coating giving each bite a satisfying combination of crispiness and meltiness.

I’ve been meaning to make them on my own for a while now, yet never seemed to get around to it. But when Deb over at Smitten Kitchen posted a recipe recently, I could no longer resist. The process ended up being simpler than anticipated and the hardest part was undeniably the wait for the overnight rise. The next morning (very early, I couldn’t wait any longer!) I shaped the dough while making my coffee and basked in the smells of butter and caramel as they cooked. They were fantastic on their own but no harm ever comes from a little chocolate drizzle, powdered sugar, and whipped cream, right? After spending the morning indulging in a solitary waffle feast and then pondering the ways to clean burned sugar off the waffle iron**, I froze the remainders in an attempt to maintain some sense of self-control and swore to myself I would never go so long without a Liège waffle ever again.

*pearl sugar is a little difficult to find, but, when in doubt turn to Amazon
**a small offset spatula to pry out larger pieces and then a damp washcloth

Liège Waffles
Makes 16 waffles
From Smitten Kitchen

Ingredients
½ cup whole milk
¼ cup water
2 Tbs. brown sugar
1 packet of active dry yeast
2 room temperature eggs
2 tsp. vanilla extract
3 2/3 cup all-purpose flour
1 tsp. kosher salt
14 Tbs. unsalted butter, softened
1 1/3 cups Belgian pearl sugar

Start by making the dough. Combine the milk and water and heat until lukewarm. Pour into the bowl of a stand mixer. Add the brown sugar and yeast, give it a stir, and set aside for about 5 minutes to allow the yeast to activate. Whisk in the eggs and the vanilla and then use a rubber spatula to stir in 1-1.5 cups of the flour. Stir in the salt. Now slowly incorporate the butter. I took a spoonful at a time and used the rubber spatula to mash it against the side of the bowl and mix it into the batter. Do this until all of the butter is added (it will take a little while).

Hook the bowl up to the stand mixer and attach the dough hook. Add the remaining flour and turn the machine to medium speed to allow it to knead for 5 minutes. Add more flour if it looks too wet. Once the dough is finished, shape into a ball and place in a bowl. Cover and leave it out at room temperature for 2 hours. It should double in size. Punch down the dough, reshape into a ball, cover the bowl again, and place in the refrigerator overnight.

The next day, transfer the dough to the countertop and knead in the pearl sugar. Once incorporated, divide into 16 even pieces. While you are doing this, heat the waffle maker. Place two balls of dough on opposite ends of the machine and cook according to the instructions. Since my waffle maker is nothing fancy, I found that the waffles turned out best when I spent about half of the cooking time clamping the iron shut with my hands so that the waffles cooked uniformly. Once the shape set, I could let go and let them finish cooking. Once golden brown, use tongs to transfer the waffle to a cooling rack (be careful, they are very hot at this point). Eat warm either plain or with the toppings of choice.  

Butter Fried Morel Mushrooms

In true Northern Virginia fashion, it appears that Mother Nature has once again overlooked quintessential spring as a season and has taken us straight to summer. I can tell because I’ve been breaking out my much larger than necessary (and still growing) collection of muscles tanks and now, after I spend about 5 minutes outside, my already fluffy hair just about doubles in volume. I love every bit of it.

Despite the weather though, it still very much looks like spring at the farmers market. Local asparagus, so tender it probably doesn’t even need to be cooked, still remains and I bought the first of the strawberries just today.  They are small crimson jewels with concentrated sweetness in every creamy bite. Honeysuckle and autumn olive trees are blooming along the bike path where I run, filling the dewy morning with sweet perfume and the muffled sounds of the earth waking up to the early light.

So much of this brings childhood memories flooding back. It takes me to mornings helping my dad in the garden or learning from him about keeping bees and to weekends spent with triple-header softball games. It spurs memories of strawberry shortcake for dinner and walking through the woods in the backyard playing a game I dubbed “Hakin’ Breakin’” which involved whacking thin low-hanging branches off trees with large sticks… I had to do something to entertain myself. And it brings back memories of a rare and special treat: fried morel mushrooms.

My dad has always had a knack for finding them despite the fact that they are only around for about 1 week out of the year. He spots them first during an early morning of turkey hunting after a period of rain and then goes on a foraging frenzy, harvesting enough for several days of indulgent fried mushroom feasting. We prepare them by dredging the halved mushrooms in flour, then egg, and finally saltine cracker crumbs before frying them in a ridiculous amount of butter. All they need after than is a healthy dose of flaky salt and are best eaten standing around the counter and shoveling them down while still crispy and hot.

So when my dad brought be the last of this year’s batch of mushrooms to me today, I jumped on the chance to make one of my favorite things for my roommates and I. They were gone in 5 minutes.

Butter Fried Morel Mushrooms

Ingredients
12-15 Morel Mushrooms, halved lengthwise
1 cup all-purpose flour, seasoned with a bit of salt and pepper
2 eggs beaten with a little bit of water
1 sleeve of saltine crackers, pulverized into dust
6 Tbs butter + 2 Tbs olive oil

Start by prepping all of the ingredients and getting a nice assembly line prepared. Submerge the mushrooms in a bowl of cool water to remove any bugs or dirt and let drain on some paper towels until dry. Once dry dust all of the mushrooms in the flour so they are lightly coated. Then, taking one mushroom at a time, dip it in the egg until fully covered and then coat it in the cracker crumbs. Set on a plate until all of the mushrooms have the cracker coating.

Heat the butter and olive oil in a large frying pan on medium heat. Once heated, add the mushrooms to the pan. When they are golden brown flip them with tongs until brown and crispy on the other side. Once all of the butter is absorbed and the mushrooms are brown all over, tip them onto a serving dish, sprinkle with lots of flaky salt, and eat as fast as you can.

The Wild and Wonderful World of Kombucha

If you have known me at any point in the last few years, you have more likely than not been on the receiving end of a lengthy one-way discussion where I force you to learn about brewing kombucha.  I probably tricked you into trying it too. Thank you to you all for putting up with it. I am not sorry at all. But if you have not, it is finally your lucky day! After having started up the brewing process yet again about 2 weeks ago, I have now once and for all documented my strange, nerdy hobby.

It all began when Sarah from The Yellow House gave me my first culture, a piece of her own, to start brewing for myself. I fell in love with the process instantly and have been brewing on and off ever since. It’s one of the simplest fermentation projects you can take on with quick and delicious results but first, let’s step back and talk about what kombucha is in the first place.

In short, it’s a fermented fizzy tea drink known for its probiotic properties. In order to brew your own, you need a starter culture, which is known as the “mother” or a “SCOBY”, meaning Symbiotic Colony of Bacteria and Yeast.  This cellulose mass may not be the most attractive thing in your kitchen and admittedly it’s difficult at first to trust any drink that’s been floating around with a SCOBY for a week, but once you get over that you can start to enjoy the wonderful aspects of kombucha.

So when a SCOBY is combined with sweetened black tea, multiple processes take place. The yeast first starts to consume the sugar, creating a byproduct of carbon dioxide (fizziness) and alcohol. The bacteria then ferments the alcohol, creating acetic acid, giving the resulting kombucha that tangy, vinegar-like taste. All the while probiotics begin to inhabit the liquid and the living SCOBY begins to grow, taking on the shape of its container and developing another cellulose layer with every batch made. And eventually, once it gets large enough, you can peel off the bottom layers and pass them along to a friend who may also want to make kombucha. You can also compost them. This unending cycle of fermentation makes for a constant supply of this sweet and sour drink for as long as you continue to take care of your culture.

Although it took a few times to get used to the system of bottling my fermented kombucha and preparing a new batch, it soon became a part of my weekly routine. After a week of fermenting, I like to store my finished kombucha in the fridge, which stops the fermentation process and keeps the finished product at a mildly tangy level. I bring an iced glass to work each day and will add some fresh juice, fresh fruit, and/or some herbs to the glass for a little extra flavor. I purchased my most recent SCOBY from Kombucha Brooklyn and it has been doing great. Currently I’m in the process of trying to name it and so far my roommates have helped me come up with Scoby Dooby Doo, Scoby Wan Kenobi, and Scoby Bryant. I haven’t decided which I like best…

Kombucha Brooklyn has wonderful kits with all of the supplies and instructions needed for getting started. But, if you just so happen to have a nice friend to pass along a piece of SCOBY and all of the necessary materials, here’s how you can start brewing kombucha yourself.

How to Make Kombucha

Materials Needed

1 SCOBY, plus 2 cups of already-made kombucha from a previous batch, or store-bought if just beginning

8 teabags (Kombucha needs black tea to survive. I personally like Darjeeling but standard black or oolong would work as well. You can swap out one or two of the bags with a green or herbal tea if you want to mix up the flavor, but would not suggest any tea with essential oils like earl grey.)

1 cup white granulated sugar

1 gallon (16 cups) water

a 1-gallon glass container or ceramic crock

a thin cotton cloth

a rubber band

a funnel

growlers or a pitcher for storage

Instructions

Begin by bringing 4 cups of the water to a boil in a large pot. Once boiling, turn off the heat and add the teabags. Let steep for 30 minutes. Once brewed, squeeze out as much liquid as possible from the teabags and discard. Add the sugar and stir until dissolved. Add in 8 more cups of water to bring the mixture to room temperature. Transfer to your gallon-size brewing receptacle.

Add the SCOBY to the jar with the tea as well as the already-made kombucha. Add in more water until you have an inch and a half of space between the liquid and the lip of the jar. Drape your cloth over the top and secure with the rubberband.

Place the jar in a non-disruptive place in your home (mind you there will be a faint smell of vinegar around the jar at all times) and let the mixture brew for a week. After the week is up, the kombucha is ready and can be bottled. Remove the SCOBY and place on a plate. Transfer the liquid from the jar to your pitcher or growler with a funnel, setting aside another 2 cups for the next batch. Wash all of your brewing materials and begin the process again!