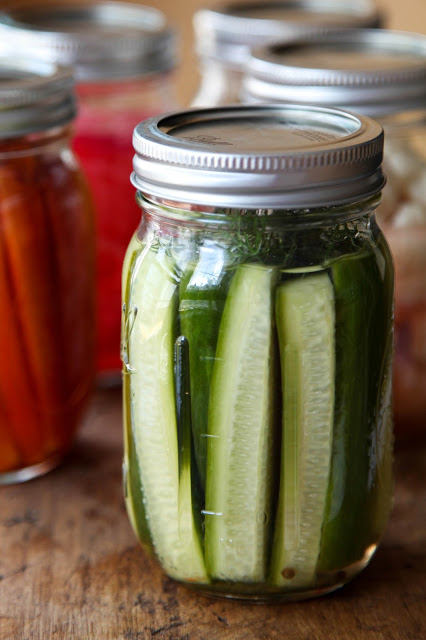
Quick Pickled Vegetables

People always told me that time will start to go faster the older you get.

They were right.

Maybe it’s my quarter-century crisis coming 1 month early but lately I have felt more than ever how fleeting time can be, and it has maybe put me in a bit of a funk. I’m lucky to say that the last 12 months of my life have been some of my best. I experienced a lot of “firsts”, went through some really strong emotional states, both wonderful and terrible, welcomed new people into my life, and then lost some. 

So much happened, including a lot of growth, and it’s terrifying how it all feels condensed into this brief flicker. How is it that a period of such importance passed in what feels like a snap of my fingers? If I had been more present, could I have prolonged that feeling of time? Would I still be where I am right now?

Like I said, quarter-life crisis is real.

With all of that in mind though, I have felt more than ever how important it is to be living in the moment. I want to savor life for all that it is worth and be more mindful and aware about how I am growing and feeling during each new experience. Whether I’m learning a new skill, or doing something that scares me, or simply taking time to be introspective, I hope for each day to end having been lived well and with purpose and a positive mind and spirit.

Food, in the way it initiates the awareness of all senses and inspires learning through creation, somehow tends to expand that feeling of time. Which brings me to these pickles. Lately, I’ve been more and more craving the tangy, briny taste of pickled anything. I’ve been putting capers on my omelets, cornichons on my sandwiches, olives on just about everything else. When I came across the recipe for quick pickled vegetables in Alice Waters’ The Art of Simple Food, it seemed like just the right thing for my current frame of mind.

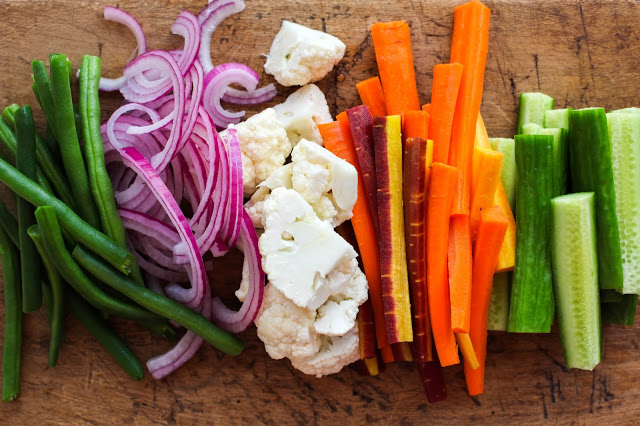
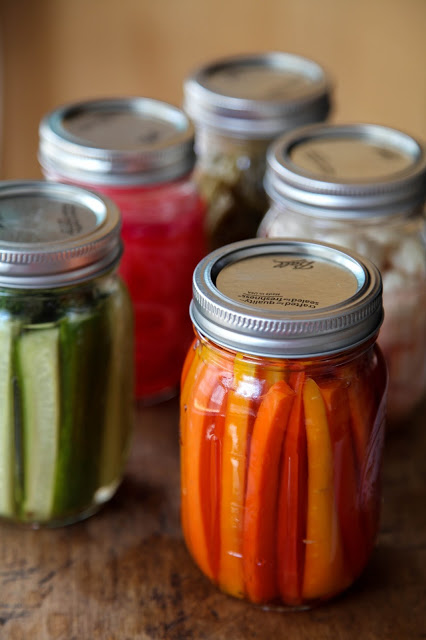
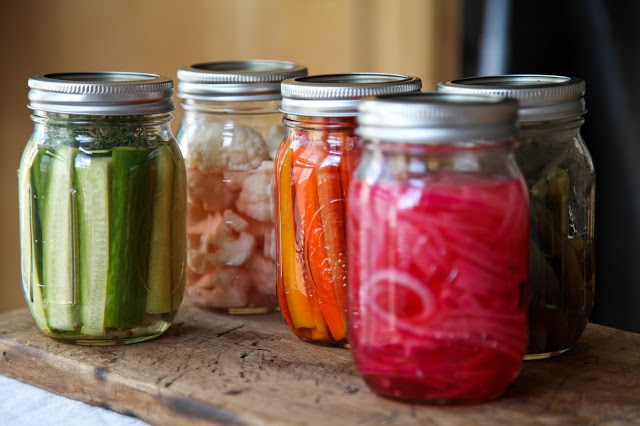
It’s a pickle that can be created and eaten in the same day, providing a fun daytime diy project with almost instant and delicious gratification after a brief cooling period in the fridge. You can pickle just about any vegetable but I decided to try cucumbers, carrots, green beans, red onions, and cauliflower. The pickled carrots were a clear winner, straddling that fine line between sweet and sour. They all go wonderfully alongside a selection of meats, cheeses, crackers and maybe some hard-boiled eggs. I also discovered that warm boiled potatoes lightly mashed with some crème fraiche, dill, and thyme, and topped with flakes of hot smoked salmon, loads of pickled red onions, and a nice dose of salt and cracked black pepper, make for a fantastic dinner on a relaxing summer evening. I have a feeling that these pickles will make a number of appearances throughout my summer, whether enjoyed on my own or with family and friends, and hopefully they make it just that much more memorable and meaningful.

Quick-Pickled Vegetables
From Alice Waters’ The Art of Simple Food
Makes enough pickling brine for about 4 jars of vegetables

Ingredients
1½ cups white wine vinegar
1¾ cups water
2½ Tbs. sugar
½ bay leaf
4 thyme sprigs
pinch of dried chili flakes
½ tsp. coriander seeds
2 whole cloves
1 garlic clove, peeled and cut in half
a big pinch of salt
fresh vegetables, cleaned, cut and prepped for pickling

To make the pickling brine, combine all of the ingredients (except the vegetables) in a pot and bring it to a boil. Add each type of vegetable to the brine separately (except the onions and cucumbers**) and cook until softer, but definitely still crisp. Use tongs to remove the vegetables and set them aside on a plate until cool. Continue cooking each type of vegetable until finished. Let the brine and vegetables cool to room temperature. Once cool, pack the vegetables into mason jars, cover with the brine, and place the lid on the jar. They will keep in the refrigerator for a week.

**Since the onions and cucumbers are so soft already, no need to pre-cook them. Just place them raw in the jars (I added some dill sprigs to the jar with the cucumbers) and add the hot pickling brine directly to the jars. Cover the jar with the lid and leave out until it cools to room temperature. Then store in the fridge with the rest. 

Honeycomb Ice Cream for my 100th Post!

I am very excited to say that this is officially my 100th post on Honeycomb. Just a month shy of when it all started 4 years ago, I can’t believe that number 100 is already here. I also can’t believe that, when averaged out, that means I’ve done one post about every 2 weeks. I thought I was way lazier than that so that’s just crazy.

It’s a bit of a strange feeling to get to this point though. I will admit that in the 4 years, there are have been many times where I simply thought about giving it all up. When I started, the food blog thing was certainly an up-and-coming fad but still not too widespread. I had these grandiose ideas that one day some fancy pants food magazine would give it a shout-out and the popularity would grow rampant. But after a long time of that not happening and food blogs becoming something that seemingly everyone and their mother had, I started to lose a bit of steam. What was the point if no one was reading it?

But every time I would get like that, something would pull me back. Maybe someone would tell me that they shared it with a friend or that they cooked one of the recipes and it turned out great. Something little but more than enough to make it all seem worth it again. The blog has changed a lot from post 1 to post 100. It started with a bit of a hippie health blog vibe, moving into angsty posts from my days spent trying to find a job, and shifting into what it is now which focuses heavily on the photography and seasonal eating with travel dining guides thrown in whenever I take a trip. I’m quite happy with where it is today and seeing how it has developed and I continue to be so glad for those moments that keep it all going!

So, to celebrate, what could be more appropriate than some honeycomb ice cream! This is probably my simplest ice cream yet but extremely satisfying. The ice cream base is straight up vanilla custard. It’s crazy sweet but unapologetically so. It gets a fantastic crunch and extra layer of flavor from handfuls of crushed-up honeycomb candy throughout. The best part is, the candy starts to melt a little in the freezer too, giving the ice cream a burnt sugar swirl. To balance out the sweetness, I highly recommend enjoying with some dark chocolate sauce and a sprinkle of some flaky sea salt (believe me, it’s fantastic) or some nice tart raspberries. And, since were celebrating here, rainbow sprinkles. Obviously.

Honeycomb Ice Cream
Makes about a quart
Recipe from Yossy Arefi via Food 52

Ingredients

For the Honeycomb
½ cup granulated sugar
¼ cup golden syrup or dark corn syrup
1½ tsp. baking soda
pinch of salt

For the Ice Cream
2 cups heavy cream
1 cup whole milk
1 cup sugar
4 egg yolks
1½ tsp. vanilla extract
pinch of salt

Begin by making the honeycomb candy. Line a baking sheet with parchment paper. In a medium saucepan, combine the sugar and syrup and stir until it becomes a paste. Place it over a medium heat. Let it cook and bubble away until the sugar is melted and the mixture is a dark maple color. Do not stir with a spatula but you can slowly tilt and swirl the pot occasionally. This should take about 5 minutes.

Once ready, whisk in the baking soda and salt. It should bubble and foam. Quickly pour the mixture onto the sheet pan. It doesn’t matter if it’s smooth, just get it all onto the sheet as fast as possible. Let cool completely before touching again. Once cool, break up into small dime-size pieces. Store at room temp in an air-tight container until ready.

To make the ice cream, combine the cream, milk, and sugar in a medium saucepan. In a separate bowl, whisk the egg yolks together. Place the saucepan over medium heat and stir until the sugar is dissolved. When the mixture starts to get small bubbles around the outside edge of the pot, remove from the heat. Slowly pour a little bit at a time into the bowl of egg yolks, while whisking. Once you’ve added about a half-cup, pour the warmed egg yolks back into the pan with the milk mixture.

Return the saucepan to the stove over medium heat. Continue cooking and stirring constantly until the mixture is thickened and coats the back of a spoon. This will take about 4-5 minutes. Remove from the heat and stir in the vanilla and salt. Pour into a container and let sit in the fridge overnight.

Then next day, churn the ice cream according to the machine’s instructions. Just before the ice cream is done churning, add in about ¾ cup to 1 cup of the honeycomb candy. Transfer the ice cream to a freezer-safe container and let freeze for at least 3 hours before eating. As mentioned above, it’s agreat with chocolate sauce, sea salt, and berries.

Israeli Couscous with Ricotta and Mint

In the past year or so I have really been making progress in visiting new states and big U.S cities, starting with Arizona, then to NYC, over to San Francisco, down to Charleston, South Carolina, and finally, this past weekend to Nashville. Granted I spent all of about 2 hours in Nashville before heading an hour south for the wedding of my beautiful friend Kelly, but had a blast celebrating in a go-big or go-home southern style. I ate too much, I drank too much, I regret nothing.

I left my camera at home for this trip, sadly passing up the chance to document some really awesome eats (lot of biscuits included!) but did manage to hit up a few lunch and coffee spots that I would highly recommend.** So, after returning home yesterday, nursing a wicked hangover and eating a salad for dinner as if cancel out a weekend full of butter-laden and whiskey-induced damage, I decided a little casual cooking and something to attempt to wean me back into a normal food routine couldn’t hurt.

This recipe for Israeli couscous with ricotta and mint is a nice way to bring some comfort and freshness to what is now straight-up summer weather. After par-cooking some Israeli couscous, the rest comes together in one skillet. Bacon and onion get to know each other in the pan before joining forces with a hefty dose of white wine, chicken broth, peas, the pasta and fresh mint. What remains is something borderline soup-ish, a brothy pasta dish that gets several dollops of ricotta and a good drizzle of olive oil at the end. Coming together quite quickly, it makes for a great after work, recovery day dish.

**For a great cup of coffee check out the super-hipster Barista Parlor and then head to The Pharmacy Burger just down the road for burgers, beers, and housemade German sausages. And, if you have a car, I highly recommend a tour at the Jack Daniel’s distillery in Lynchburg, about an hour south of the city.

Israeli Couscous with Ricotta and Mint
Serves 4
Recipe from Bon Appetit

Ingredients
1¼ cups dry Israeli Couscous
2 Tbs olive oil, plus more for serving
4 slices of bacon, chopped
1 onion, chopped
1 cup dry white wine (I used a pinot grigio)
2½ cups low-sodium chicken broth
1 cup frozen peas
2 Tbs. finely chopped fresh mint
Whole milk ricotta, for serving
Salt and pepper

Cook the Israeli couscous in a large pot of salted boiling water for 6 minutes. Reserve 1 cup of the cooking water and drain the pasta. Set aside.

In a large skillet, heat the oil over medium. Add the bacon and cook, stirring often until it starts to brown, about 5 minutes. Add the onion and continue to cook for another 5 minutes. The bacon should be crispy at this point. Add the wine, bring the mixture to a simmer and cook for another 5 minutes. Add in the broth and the pasta and return to a simmer. Cook until thickened and the pasta is al dente, about 5-8 minutes more. Give it a taste and season with salt and pepper, as desired. Add the peas and mint and cook for another 2 minutes, adding some of the reserved pasta water if it gets too thick.

Serve in a bowl with many dollops of ricotta, torn fresh mint leaves, olive oil, cracked black pepper, and a sprinkling of flaky sea salt.

Liège Waffles

In the realm of sweet breakfast-y things that are generally paired with butter and, my favorite condiment, maple syrup, waffles are without a doubt my numero uno. Over the years it evolved from the Eggos and Aunt Jemima of my childhood to the classic Belgian style with real syrup, and then became more experimental. I had much success with the previously documented oat and orange waffles with whipped cottage cheese and pear-cherry compote and I have dipped my toe in the realm of the yeast-raised variety. And yes, I am talking about the ever-famous Marion Cunningham ones. But I must say, despite a whole lot of waffle lovin’ in my life, the ones that changed everything are the Liège waffles.

I first had them in what now seems like a full state of waffle naiveté from a food cart in London. On that chilly fall day, waffle-in-hand and walking through Hyde Park, I took a bite, expecting something along the lines of the crispy pancake-esque waffles I was used to but got so much more. Made from a slow rising yeast dough, enriched with lots of butter and eggs (think brioche) and studded with handfuls of Belgian pearl sugar*, the Liège waffle, once cooked in the waffle iron, becomes a whole new beast.

The inside stays very tender and light but at the same time has a nice bit of chew and stretch to it, like a croissant. But the magic happens on the outside. The pieces of pearl sugar completely melt with the heat of the iron coating every part of the waffle exterior with molten caramel. Once cooked, removed and let to cool slightly, this sugar hardens into a paper thin layer of crackly sugar coating giving each bite a satisfying combination of crispiness and meltiness.

I’ve been meaning to make them on my own for a while now, yet never seemed to get around to it. But when Deb over at Smitten Kitchen posted a recipe recently, I could no longer resist. The process ended up being simpler than anticipated and the hardest part was undeniably the wait for the overnight rise. The next morning (very early, I couldn’t wait any longer!) I shaped the dough while making my coffee and basked in the smells of butter and caramel as they cooked. They were fantastic on their own but no harm ever comes from a little chocolate drizzle, powdered sugar, and whipped cream, right? After spending the morning indulging in a solitary waffle feast and then pondering the ways to clean burned sugar off the waffle iron**, I froze the remainders in an attempt to maintain some sense of self-control and swore to myself I would never go so long without a Liège waffle ever again.

*pearl sugar is a little difficult to find, but, when in doubt turn to Amazon
**a small offset spatula to pry out larger pieces and then a damp washcloth

Liège Waffles
Makes 16 waffles
From Smitten Kitchen

Ingredients
½ cup whole milk
¼ cup water
2 Tbs. brown sugar
1 packet of active dry yeast
2 room temperature eggs
2 tsp. vanilla extract
3 2/3 cup all-purpose flour
1 tsp. kosher salt
14 Tbs. unsalted butter, softened
1 1/3 cups Belgian pearl sugar

Start by making the dough. Combine the milk and water and heat until lukewarm. Pour into the bowl of a stand mixer. Add the brown sugar and yeast, give it a stir, and set aside for about 5 minutes to allow the yeast to activate. Whisk in the eggs and the vanilla and then use a rubber spatula to stir in 1-1.5 cups of the flour. Stir in the salt. Now slowly incorporate the butter. I took a spoonful at a time and used the rubber spatula to mash it against the side of the bowl and mix it into the batter. Do this until all of the butter is added (it will take a little while).

Hook the bowl up to the stand mixer and attach the dough hook. Add the remaining flour and turn the machine to medium speed to allow it to knead for 5 minutes. Add more flour if it looks too wet. Once the dough is finished, shape into a ball and place in a bowl. Cover and leave it out at room temperature for 2 hours. It should double in size. Punch down the dough, reshape into a ball, cover the bowl again, and place in the refrigerator overnight.

The next day, transfer the dough to the countertop and knead in the pearl sugar. Once incorporated, divide into 16 even pieces. While you are doing this, heat the waffle maker. Place two balls of dough on opposite ends of the machine and cook according to the instructions. Since my waffle maker is nothing fancy, I found that the waffles turned out best when I spent about half of the cooking time clamping the iron shut with my hands so that the waffles cooked uniformly. Once the shape set, I could let go and let them finish cooking. Once golden brown, use tongs to transfer the waffle to a cooling rack (be careful, they are very hot at this point). Eat warm either plain or with the toppings of choice.  

Butter Fried Morel Mushrooms

In true Northern Virginia fashion, it appears that Mother Nature has once again overlooked quintessential spring as a season and has taken us straight to summer. I can tell because I’ve been breaking out my much larger than necessary (and still growing) collection of muscles tanks and now, after I spend about 5 minutes outside, my already fluffy hair just about doubles in volume. I love every bit of it.

Despite the weather though, it still very much looks like spring at the farmers market. Local asparagus, so tender it probably doesn’t even need to be cooked, still remains and I bought the first of the strawberries just today.  They are small crimson jewels with concentrated sweetness in every creamy bite. Honeysuckle and autumn olive trees are blooming along the bike path where I run, filling the dewy morning with sweet perfume and the muffled sounds of the earth waking up to the early light.

So much of this brings childhood memories flooding back. It takes me to mornings helping my dad in the garden or learning from him about keeping bees and to weekends spent with triple-header softball games. It spurs memories of strawberry shortcake for dinner and walking through the woods in the backyard playing a game I dubbed “Hakin’ Breakin’” which involved whacking thin low-hanging branches off trees with large sticks… I had to do something to entertain myself. And it brings back memories of a rare and special treat: fried morel mushrooms.

My dad has always had a knack for finding them despite the fact that they are only around for about 1 week out of the year. He spots them first during an early morning of turkey hunting after a period of rain and then goes on a foraging frenzy, harvesting enough for several days of indulgent fried mushroom feasting. We prepare them by dredging the halved mushrooms in flour, then egg, and finally saltine cracker crumbs before frying them in a ridiculous amount of butter. All they need after than is a healthy dose of flaky salt and are best eaten standing around the counter and shoveling them down while still crispy and hot.

So when my dad brought be the last of this year’s batch of mushrooms to me today, I jumped on the chance to make one of my favorite things for my roommates and I. They were gone in 5 minutes.

Butter Fried Morel Mushrooms

Ingredients
12-15 Morel Mushrooms, halved lengthwise
1 cup all-purpose flour, seasoned with a bit of salt and pepper
2 eggs beaten with a little bit of water
1 sleeve of saltine crackers, pulverized into dust
6 Tbs butter + 2 Tbs olive oil

Start by prepping all of the ingredients and getting a nice assembly line prepared. Submerge the mushrooms in a bowl of cool water to remove any bugs or dirt and let drain on some paper towels until dry. Once dry dust all of the mushrooms in the flour so they are lightly coated. Then, taking one mushroom at a time, dip it in the egg until fully covered and then coat it in the cracker crumbs. Set on a plate until all of the mushrooms have the cracker coating.

Heat the butter and olive oil in a large frying pan on medium heat. Once heated, add the mushrooms to the pan. When they are golden brown flip them with tongs until brown and crispy on the other side. Once all of the butter is absorbed and the mushrooms are brown all over, tip them onto a serving dish, sprinkle with lots of flaky salt, and eat as fast as you can.