
Hummus, the Real Way
I had a slight epiphany the other day.
I was sitting at a table in the building where I have my major classes and was shoveling down my lunch before class when my teacher, who knows I like to cook and has read my blogs, walked by and commented, “Oh, so did you make that hummus?” I’m sure he wouldn’t have been surprised to hear a, “yes, just whipped it up last night,” and probably expected a detailed explanation of the recipe but instead I turned my head toward the tasteless and lumpy dip and replied with a resounding, “no.”

He left, probably thinking no more about the encounter but I felt embarrassed. I realized that I have been spending entirely too much money on tubs of hummus that I don’t even enjoy from the grocery store. I’m sure I’ve tried almost every brand out there and each one leaves me disappointed and struggling to finish it off. It’s always either too grainy or the flavor has the unpleasing bitterness of granulated garlic and onion. That, along with the list of stabilizers and preservatives among with the ingredients, just leaves me yearning for a better way to spend my precious dollars.
Solution: I’m making my own.
Why I never did this before is beyond my comprehension. I suppose it was the thought of having to wait overnight for chickpeas to soak and the hefty price tag on the jars of tahini. But when I did the math and discovered that a jar of tahini and a couple pounds of dried beans is enough for several month’s worth of hummus, I realized that the homemade way, though not exactly a time-saver, is a definite bargain for a product that I am waaaay happier with.
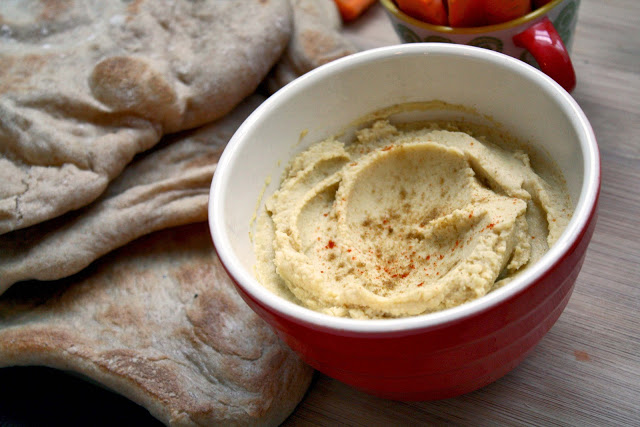
It’s difficult to explain homemade hummus to someone who has never tasted its wonders, to get the point across that a gloopy puree of beans can be so much more than just a way to make carrots taste more exciting. Homemade hummus is almost a dish in itself. It begs to be eaten plain with a spoon, though that’s not to say crudités and pita don’t benefit from its flavors. It showcases the earthy, sweet, and natural flavors of the chickpea itself without the cloyingness of excessive artificial garlic. And the chickpeas are brightened by a dash of lemon and cumin, intensified by the toasted nuttiness of the tahini, and transformed into pure velvety richness as they’re pureed with fruity olive oil and their natural cooking water. The texture really is astounding; it’s fluffy and creamy and when you drag a spoon through it makes a little crackling noise of millions of popping air bubbles.
So now I eat my lunches a little more proudly. Though everyone else may assume my hummus is another $4.00 waste from the grocery store, my taste buds know the truth. It’s the real deal.

Hummus and Pita
Adapted from The Healthy Foodie
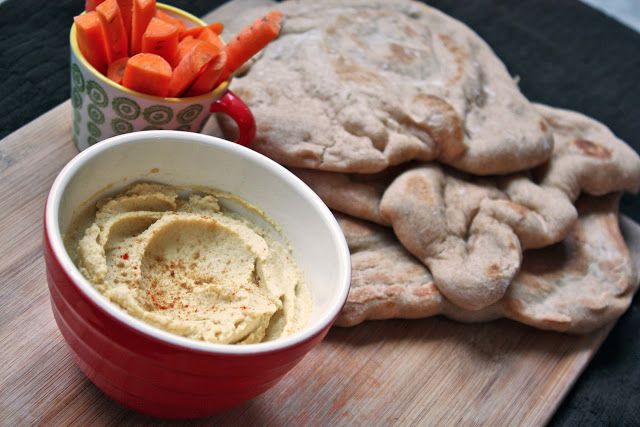
Don’t be scared away by the prospects of using dried chickpeas. It just means a little planning ahead. But honestly, it makes a world of a difference since they are not impregnated with the salty brine that canned chickpeas reside with. Also, the trick of soaking and cooking the chickpeas with baking soda makes a huge difference. The soda really allows the beans to reach a point of maximum softness so they puree into such creaminess. If you really must use canned chickpeas, use two drained and rinsed cans as a replacement and just plain warm water. I like to eat my hummus with carrots, celery, snow peas, and of course pita bread. The pita in the pictures is a homemade, half whole-wheat variety and you can find the recipe here. The pita breads are best the first day they are made when still warm and soft but leftover pita can be made into chips, frozen for later use, or used as a great base for mini pizzas.
Ingredients
1 cup dried chickpeas
1 Tbs. plus ¼ tsp. baking soda
¼ cup tahini
juice of ½ lemon
1 garlic clove
½ tsp. salt
½ tsp. cumin
¼-½ cup chickpea cooking liquid
¼-½ cup olive oil
Place the chickpeas in a saucepan and cover with at least an inch of water. Add 1 Tbs. of the baking soda and stir until dissolved. Let sit overnight or throughout the day (at least 8 hours). After soaking, drain the liquid and add more. Soak for an additional hour or two.
To cook the chickpeas, refresh the liquid again, this time adding enough to cover the chickpeas by at least two inches. Add the remaining ¼ tsp. of baking soda and stir to dissolve. Bring everything to a boil and cook on a medium high heat for 1 hour and 15 minutes, adding more liquid as it evaporates and skimming off any foam or skins.
When the chickpeas are finished cooking, reserve 1 cup of the liquid and drain them in a colander. If you wish, remove and discard the skins (this is not necessary). Place them in a food processor and blend until you have a thick paste. Add the tahini, lemon juice, garlic, salt, cumin, ¼ cup of the water and ¼ cup of the olive oil and puree until the hummus until it is creamy and smooth. Add more water and olive oil, as you need to, depending on the consistency you like. I like it smoother and runnier so I add more of the liquids. Adjust any other ingredients to taste as well. It tastes great freshly made and still warm but to store, transfer to an airtight container and keep in the refrigerator for up to two weeks.