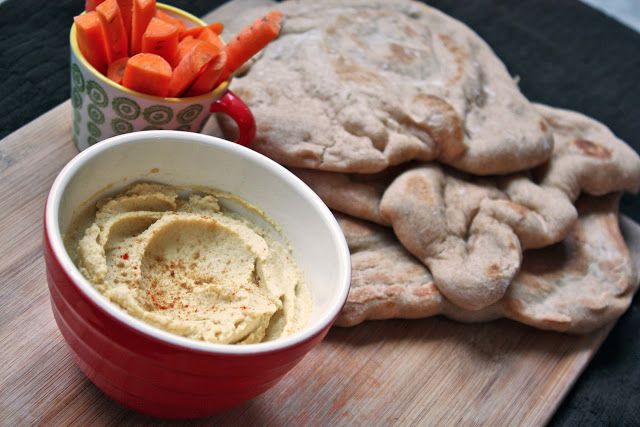
The Art of Simplicity

I find that I like to make things complex with my cooking. Maybe it’s for the sake of a little challenge, making me feel like I’m furthering my knowledge or something. Sure, why not make the elaborate curry that requires me to spend ridiculous amounts of money on spices from a specialty food market? Sound like fun! Or, macaroons? Sure. Who doesn’t love tediously piping little circles of egg whites onto parchment? Even the other day my mom told me, “Oh Katie, you’re such a Martha.” I took it as a compliment.

But whatever the reason for this extravagance, I always tend to stray from the straight path, opting for rocky, muddy, and treacherous road instead. The flair, unfortunately, doesn’t always work in my best interest. Like the time I tried to make my family a vegetarian molé chili; “you’ll love it, the secret ingredient is chocolate!” And when we sat down to bowls of a substance totally indistinguishable from garbage sludge, I had to admit defeat. Or the time I attempted making treacle tart to bring to a British themed dinner, only to end up sealing the teeth together of all who ate the cement-like toffee. Their pained but polite words of approval settled uncomfortably in my stomach.

As much I do enjoy culinary adventuresome, I still can’t deny comfort in simplicity. The food that I post here are my weekend experiments. What I eat on a normal basis is more along the line of cheese and crackers or yogurt and granola or, my new strange but favorite fixation, egg salad sandwiches. To me, taking very few ingredients and combining them in ways that result in powerfully flavored dishes is almost as much of a challenge as making those extravagant meals. I like this challenge too and through trial and error, I’ve discovered that there are keys to great simplicity in food.

First, successful simplicity requires good ingredients. Simple food does not have extra fluff to mask anything under par. There are only few components and those need to be top notch to provide heightened and optimal flavor.

Also, there needs to be contrast. This is what turns ordinary and bland into something that gets people excited. Simple does not have to be boring at all. When two or three ingredients that are different yet complementary, not only in flavor but texture, come together, it causes all senses to stimulate at once making for a memorable eating experience. And finally, it needs to be cooked with love and care, the ingredient that makes a difference in all cooking.

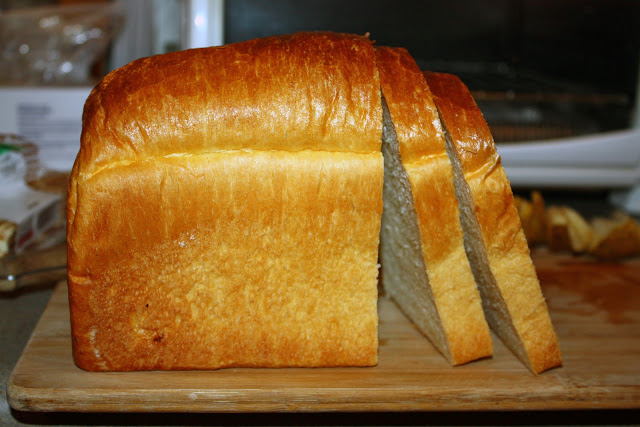
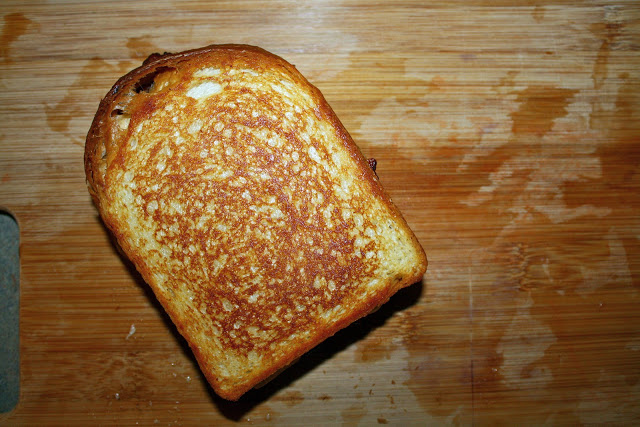
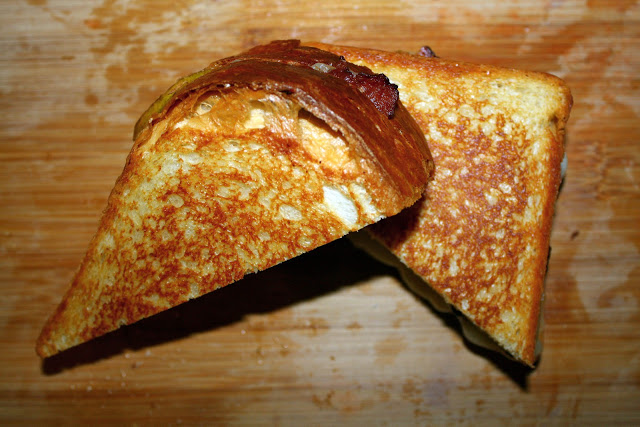
So one rainy and cold evening a few weeks ago I made grilled cheese, the ultimate comfort food, but with a twist. I cut up thick slices of ricotta bread from the farmers market. I crammed the inside with slabs of creamy Fontina cheese, crispy organic bacon, and slices of just-underripe local pears. I gave the bread a lovely swipe of butter and let it spend some time getting hot and melty in the pan.

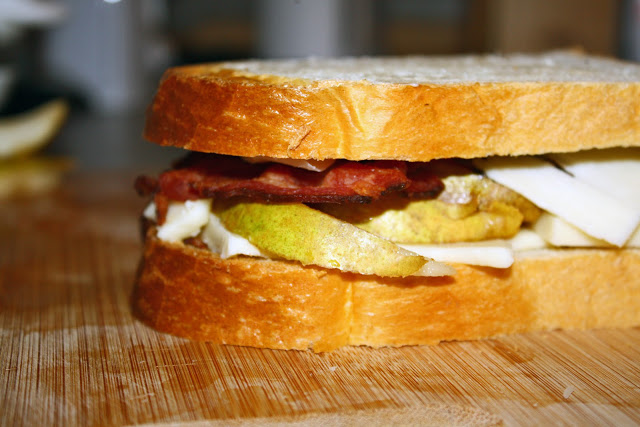
Though unconventional it worked. The sweet pears were a perfect match to the salty bacon and the Fontina, though mild, enveloped all in a buttery blanket of richness. It was the bread that really made this sandwich. It crisped up beautifully because of the high butterfat content and its milky and slightly tangy notes rounded out the whole package. I enjoyed it alone, a sublime retreat, that lasted mere minutes but felt like hours in food divinity. Each bite was like music as my teeth moved through layers of resounding crunch. In secluded gluttony, I licked my buttery fingers unashamedly for I had finally truly felt like I discovered the art of simplicity. Four ingredients (five if you count butter) and one amazing sandwich.

Fall Grilled Cheese
serves 1

All I can say about this is go all out. No skimping on this recipe please and savor it for every fatty and cheesy bite its worth. You can always work out later.

Ingredients
Ricotta bread (brioche, challah, or white country bread works too)
Fontina cheese, as much as you feel meets your standards of cheesiness
3 slices of bacon
1 slightly underripe pear
Butter

Heat a frying pan to medium and lay down the slices of bacon. Cook until crisp and drain on paper towels. Wipe out the pan and set aside for later.

As the bacon cooks, prepare the other ingredients. Slice two thick pieces of the bread and then slice as much cheese as you like. Slice the pear into quarters and then cut thin pieces from each of these. You will only need about half so you can eat the remaining slices as a snack.

To assemble lay about ¾ of the cheese on one piece of bread. Place the pears on top and them the bacon. Dot the remaining cheese on top of the bacon so it melts to the other piece of bread and holds the sandwich together. Lay the remaining piece of bread on top. Generously butter the outside of the sandwich.

Get a pan on medium heat and also turn the oven to about 400 degrees. Cook the sandwich in the pan for about 2 minutes a side, pressing down occasionally and constantly checking to make sure you don’t burn anything. Once both sides are golden brown and crispy, transfer the pan to the oven for about 2 minutes to let the cheese melt. Remove, cut any way you like, and enjoy.

Hummus, the Real Way

I had a slight epiphany the other day.

I was sitting at a table in the building where I have my major classes and was shoveling down my lunch before class when my teacher, who knows I like to cook and has read my blogs, walked by and commented, “Oh, so did you make that hummus?” I’m sure he wouldn’t have been surprised to hear a, “yes, just whipped it up last night,” and probably expected a detailed explanation of the recipe but instead I turned my head toward the tasteless and lumpy dip and replied with a resounding, “no.”

He left, probably thinking no more about the encounter but I felt embarrassed. I realized that I have been spending entirely too much money on tubs of hummus that I don’t even enjoy from the grocery store. I’m sure I’ve tried almost every brand out there and each one leaves me disappointed and struggling to finish it off. It’s always either too grainy or the flavor has the unpleasing bitterness of granulated garlic and onion. That, along with the list of stabilizers and preservatives among with the ingredients, just leaves me yearning for a better way to spend my precious dollars.

Solution: I’m making my own.

Why I never did this before is beyond my comprehension. I suppose it was the thought of having to wait overnight for chickpeas to soak and the hefty price tag on the jars of tahini. But when I did the math and discovered that a jar of tahini and a couple pounds of dried beans is enough for several month’s worth of hummus, I realized that the homemade way, though not exactly a time-saver, is a definite bargain for a product that I am waaaay happier with.

It’s difficult to explain homemade hummus to someone who has never tasted its wonders, to get the point across that a gloopy puree of beans can be so much more than just a way to make carrots taste more exciting. Homemade hummus is almost a dish in itself. It begs to be eaten plain with a spoon, though that’s not to say crudités and pita don’t benefit from its flavors. It showcases the earthy, sweet, and natural flavors of the chickpea itself without the cloyingness of excessive artificial garlic. And the chickpeas are brightened by a dash of lemon and cumin, intensified by the toasted nuttiness of the tahini, and transformed into pure velvety richness as they’re pureed with fruity olive oil and their natural cooking water. The texture really is astounding; it’s fluffy and creamy and when you drag a spoon through it makes a little crackling noise of millions of popping air bubbles.

So now I eat my lunches a little more proudly. Though everyone else may assume my hummus is another $4.00 waste from the grocery store, my taste buds know the truth. It’s the real deal.

Hummus and Pita
Adapted from The Healthy Foodie

Don’t be scared away by the prospects of using dried chickpeas. It just means a little planning ahead. But honestly, it makes a world of a difference since they are not impregnated with the salty brine that canned chickpeas reside with. Also, the trick of soaking and cooking the chickpeas with baking soda makes a huge difference. The soda really allows the beans to reach a point of maximum softness so they puree into such creaminess. If you really must use canned chickpeas, use two drained and rinsed cans as a replacement and just plain warm water. I like to eat my hummus with carrots, celery, snow peas, and of course pita bread. The pita in the pictures is a homemade, half whole-wheat variety and you can find the recipe here. The pita breads are best the first day they are made when still warm and soft but leftover pita can be made into chips, frozen for later use, or used as a great base for mini pizzas.

Ingredients
1 cup dried chickpeas
1 Tbs. plus ¼ tsp. baking soda
¼ cup tahini
juice of ½ lemon
1 garlic clove
½ tsp. salt
½ tsp. cumin
¼-½ cup chickpea cooking liquid
¼-½ cup olive oil

Place the chickpeas in a saucepan and cover with at least an inch of water. Add 1 Tbs. of the baking soda and stir until dissolved. Let sit overnight or throughout the day (at least 8 hours).  After soaking, drain the liquid and add more. Soak for an additional hour or two.

To cook the chickpeas, refresh the liquid again, this time adding enough to cover the chickpeas by at least two inches. Add the remaining ¼ tsp. of baking soda and stir to dissolve. Bring everything to a boil and cook on a medium high heat for 1 hour and 15 minutes, adding more liquid as it evaporates and skimming off any foam or skins.

When the chickpeas are finished cooking, reserve 1 cup of the liquid and drain them in a colander. If you wish, remove and discard the skins (this is not necessary). Place them in a food processor and blend until you have a thick paste. Add the tahini, lemon juice, garlic, salt, cumin, ¼ cup of the water and ¼ cup of the olive oil and puree until the hummus until it is creamy and smooth. Add more water and olive oil, as you need to, depending on the consistency you like. I like it smoother and runnier so I add more of the liquids. Adjust any other ingredients to taste as well. It tastes great freshly made and still warm but to store, transfer to an airtight container and keep in the refrigerator for up to two weeks.

Hot 'n' Cold

Yes, today is the first day of fall. And if I the weather of both today and the last three weeks were to have a theme song, the royalties would have to go to our very own Katy Perry because yes, this weather is PMS-ing like a bitch, I would know! It rains…a lot…and drops down to 45 degrees…and then rains again…and then goes up to 85 degrees, turning the universe into a giant sauna. And this is all in the matter of a day! I’ve been waiting and waiting but those typical crisp cool days where the sky is blue and the air fresh and dry, yeah, they haven’t made a single appearance.

So you know what I did. I decided that maybe the only fix is to be a little mocking. Maybe, I thought, if I brought a little Hot 'n' Cold, a little contrast, I might just get this weather to whip itself back into shape. So of course I used food to implement my plan.

The Hot: Beef Meatball Curry. 

Oh man. This stuff is pretty insane. I loooove curry but don’t get to eat it a lot because my dad isn’t too crazy about spicy stuff and there are no Indian restaurants in my hometown. So now, living on my own, I took full advantage of the fact that I can make a big pot of curry and eat it for four days straight. I just ate the last bit of it a few hours ago and it was still as delicious as it was on day one.

Organic grass fed beef is mixed with hot red chili and ginger and shaped into little meatballs. And then they are slowly simmered in a vat of tomato and coconut sauce flavored with shallots, ginger, garlic, cumin, coriander, and cayenne. The aromas in my kitchen wafted around me in en exotic dance. My tastebuds did the same with each spoonful of sauce and beef-soaked brown basmati rice and naan. The recipe came from Aarti Sequeira. You can find it here. I made it almost verbatim but excluded the cilantro (yuck), used only half of a milder red chili, only 3 cloves of garlic, used a can of diced tomatoes instead of fresh, and reduced the added water to ¼ cup. I really like her by the way and her approach at making Indian food accessible to everyone. I hope she comes out with a cookbook soon.

The Cold: Mint Ice Cream

I actually made this a while ago but one can only go through so much ice cream. The dessert plays up the coldness in two ways. First, obviously, it’s physically cold in the mouth with microscopic ice crystals melting into creaminess on the tongue. But second, a refreshing coolness comes from the fresh peppermint that I got at the farmer’s market. When making it, the mint hangs out with the milk for about 2 hours, permeating it with its tingling qualities. I got the recipe from David Lebovitz and just left out the chocolate because I wanted the pure mint flavor to shine. I loved it although if I try mint ice cream again I may go for a Philadelphia style because the custardiness of the eggs overpowered the mint somewhat.

So will my culinary weather mocking work…I guess we’ll see. If not, I got an amazing meal out of the situation. I guess that’s one way to brighten up the day.

The Orange Season

Today was the first day of this year where I woke up and I could finally sense fall. The sun was shining, the sky was blue, and the weather went from being 85 degrees on Tuesday, to rainy and 70 degrees on Thursday, to dry, crisp, and 55 degrees today. I honestly had a little extra spring in my step. I had a fleeting urge to listen to Christmas music (it went away fast though) and while standing outside, I closed my eyes and felt like I was back in London.

While I was there last fall, I was disappointed that I would miss out on the entire fall season here in Virginia. No pumpkin patches, Halloween, scarecrows, and harvest festivals. No drives through the mountains for the sake of looking at leaves. But as it turned out, fall in England was quite wonderful. Fresh apples were still everywhere as well as a gorgeous fall fashions that only a true Londoner can pull off. By lucky chance, our tour of a traditional English village in the countryside fell on an absolutely quintessential fall day and it was honestly the one of the most perfect days I think I will ever have. Coloring leaves, Sunday church bells, thatch-roofed cottages, and a big bowl of hot, pumpkin soup. Which brings me back to my main point. England’s fall season still provided a plentiful bounty of orange root and squash vegetables. And if there is one thing you should know about me and my food obsessions, orange root vegetables and squashes are my ultimate weakness. I crave them incessantly during all seasons and all weathers. Carrots, pumpkins, butternut squashes, golden beets, sweet potatoes. England was all about them…and that made me happy.

Though, on second thought, this does not explain why UK Starbucks neglected to offer the Pumpkin Spice Latte. But that’s okay; I actually had my first one of the season today and it was most definitely worth the wait. But regardless of that, I was lucky to not have to give up my favorite food for a year for the sake of a study abroad trip. Because I don’t think I could have waited.

I also noticed that with the strong influence of Indian cuisine in London, many orange vegetables were prepared with a Middle Eastern style. Butternut squashes popped up in many vegetarian curries and carrot salads spiced with raisins and coriander were ever popular. But my favorite was the sweet potato falafel. I would get this amazing sweet potato falafel sandwich from Pret with spinach, yogurt dressing, red onion, parsley, and hummus on whole wheat bread.. And though I regretfully didn’t try it there, the food chain Leon also offered a sweet potato falafel wrap. Luckily, however, they have a cookbook with the recipe and with the help of a blog post from Heidi Swanson, I retrieved the recipe and tried it out on my own.

They were delicious too and I love that they are baked rather than fried so that the sweet potato flavor shines through rather than being clogged by oil. The sesame seeds add a nutty crunch that gives way to a warm and creamy interior. The spices give an aromatic warmth but I dipped the falafel in some plain greek yogurt which provided a cooling contrast. These little morsels were really easy to make too, which makes London and fall memories a quick meal away.

Sweet Potato Falafel
Adapted from Leon and 101 Cookbooks
Makes 18 falafel

Note: When I say easy I don’t necessarily mean quick. Though they dirty hardly any dishes and require little labor-intensive work, they do take some time. My suggestion is to bake and mash the sweet potatoes the night before and refrigerate them overnight. Then, the next morning, mix with the rest of the ingredients and let it hang out in the refrigerator all day. That way, when it’s time to make dinner, all you have to do is shape and bake the falafel. You’ll notice that they are actually vegan and gluten-free too so it’s a great way to treat people with any dietary restrictions.

Ingredients
2 medium sweet potatoes
2 cloves minced garlic
1½ tsp. ground cumin
1½ tsp. ground coriander
handful of chopped parsley
1 cup garbanzo bean flour
½ lemon
salt and pepper
sesame seeds (about 1-2 Tbs)

In a 425-degree oven place the whole sweet potatoes directly on the rack for 45 minutes to 1 hour until they are tender in the center. Remove from the oven and let them cool. Once cool, remove the flesh from the skins and either refrigerate until ready to use or move to the next step.

Mix the cooled sweet potato flesh with the garlic, cumin, coriander, parsley, garbanzo bean flour, and lemon juice in a bowl. Mash with the back of a fork until quite creamy and smooth. Season with the salt and pepper. Place the mixture in the refrigerator for at least an hour to firm up.

When ready to bake, preheat the oven to 400 degrees and oil a baking sheet. Using two large spoons, scoop up a mound of the mixture and pass it back and forth between the concave sides of the spoons to form a football-like shape, but with three curved sides. Sprinkle the outside with the sesame seeds and place on the tray. Bake for about 15-17 minutes until the sides are golden and slightly crispy. Serve immediately while warm with toasted pita and a good dipping sauce like tsatziki or, if you want to keep it vegan, and lemon tahini sauce. 

End of Summer Salad

So this is it, the “end of summer” post. The chance to bid farewell to hot days, long nights, and amazing food. It really hit me last weekend. I was browsing around the farmer’s market and everywhere I looked there were hints of fall. Squashes of all shapes and sizes were mounded at every stand from quintessential round, orange pumpkins to my favorite bell-shaped butternuts, to the oddest assortments of lumpy, crooked, and cankered looking things that I’m not even sure how to cook. I even spotted some emerald heads of broccoli that I sorely regret passing up. But the buzz of the market came when one long-awaited truck pulled up late, harboring the very last supply of the summer’s sweet corn. I swear I’ve never seen such a rush of market-goers in my life elbowing to the front of the line for their cherished two-dozen ears. It was sheer mania. And yes I did get some, three plump ears for a mere dollar. They made for an outstanding lunch. I boiled them up, cut he kernels of the cob and tossed them with a simple mix of butter, parsley, cherry tomatoes, feta, and salt and pepper. I used the knife to scrape ever bit of warm, milky sweetness from the cob into my bowl which melted and mixed with the cheese to make a salty and tangysauce. It was a great way to end the harvest.

But now its fall, which is actually my favorite season for both the food and the weather. I love the root vegetables. I absolutely love the apples and pears. I love hot coffee on crisp mornings and warm pies on cool evenings. I love the hues of rust red, ochre, and goldenrod. I love corn mazes and pumpkin patches and apple cider and mulled wine. Fall is my elixir. And though the transition into the season in compliance with tropical storms galore made this past week miserable cold and drizzly, I sit here with my just purchased fall issue of Food Network magazine patiently waiting for the typical Autumn days. School has begun, stress has settled in, Senioritis is nagging at me, but fall will get me through. It always has.

But I’ll leave you with one last hurrah for summer. A semi-recipe that makes use of the leftover bits and bobs of summer produce. It’s a meatless nicoise salad of sorts made from leftovers and essentially made to suit your tastes and whatever is in the house. The dressing is just an estimate in terms of amounts but use your own judgment to make it how you think you would like it. So here it is.

Last of Summer Salad for One

Salad Ingredients
A handful of leftover potatoes, chopped roughly
A handful of leftover green beans, chopped roughly
1 boiled egg, chopped (reserve half the yolk for the dressing)
Toasted almonds, chopped
Real Parmesan cheese shavings

Dressing Ingredients
2 parts olive oil
2 parts white wine vinegar
1 part plain yogurt or sour cream
½ part Dijon mustard
The reserve half of the egg yolk
Salt and pepper

Mix the salad ingredients expect the Parmesan together in a large bowl. In a separate bowl, whisk together the dressing ingredients until the egg yolk broken up and well incorporated. Pour the dressing over the salad and toss to coat. Top with the Parmesan and extra salt and pepper to taste. Enjoy outside, in the sun, with a cool glass of wine or sparkling fruit juice.